Tuesday, October 8, 2013

Star Wars {Birthday Party}

My baby turned 5 (wow, I'm old) and for his birthday, he wanted a Star Wars party.

I found some great printables online from All Things with Purpose.  The first was a set of signs.  I put balloons on my front porch with the sign that said "Happy Galactic Birthday."
When the guests entered the house, they went to the kitchen table where they colored their Padawan training badge that I got from Libbie Grove Design.
After they got their badge, they were able to put on their Jedi Tunic.  I bought an old sheet from a thrift store.  I cut it into strips that were about 18"x36".  I hemmed the edges and cut a hole for the head.  They tied their tunic on with a strip of brown fleece.
I had seen numerous ideas on Pinterest for pool noodle light sabers, so I showed them to my husband and told him to make them:)  I figure anything involving tape is his area of expertise.
Then the boys headed through the back door for their Jedi Training.
My older sons and Princess Leia (myself) trained the boys... we used balloons and played games like... not letting the balloon touch the ground... we even tried sticking the helium balloons in the grass with golf tees, but the boys were too abusive and hit them so hard that they pulled out of the grass and flew away.
After they were trained, Darth Vader....
.... and Darth Maul came out to fight the Jedis.  (we tried to copy the Jedi Training at Disneyland).
After training, the Jedis were hungry and thirsty, so they came back into the house where I had the party set up.
I made the banner myself and just found a free Jedi font online.
I decorated the table with the food, some light sabers and an R2D2 popcorn bucket we had bought at Disneyland.
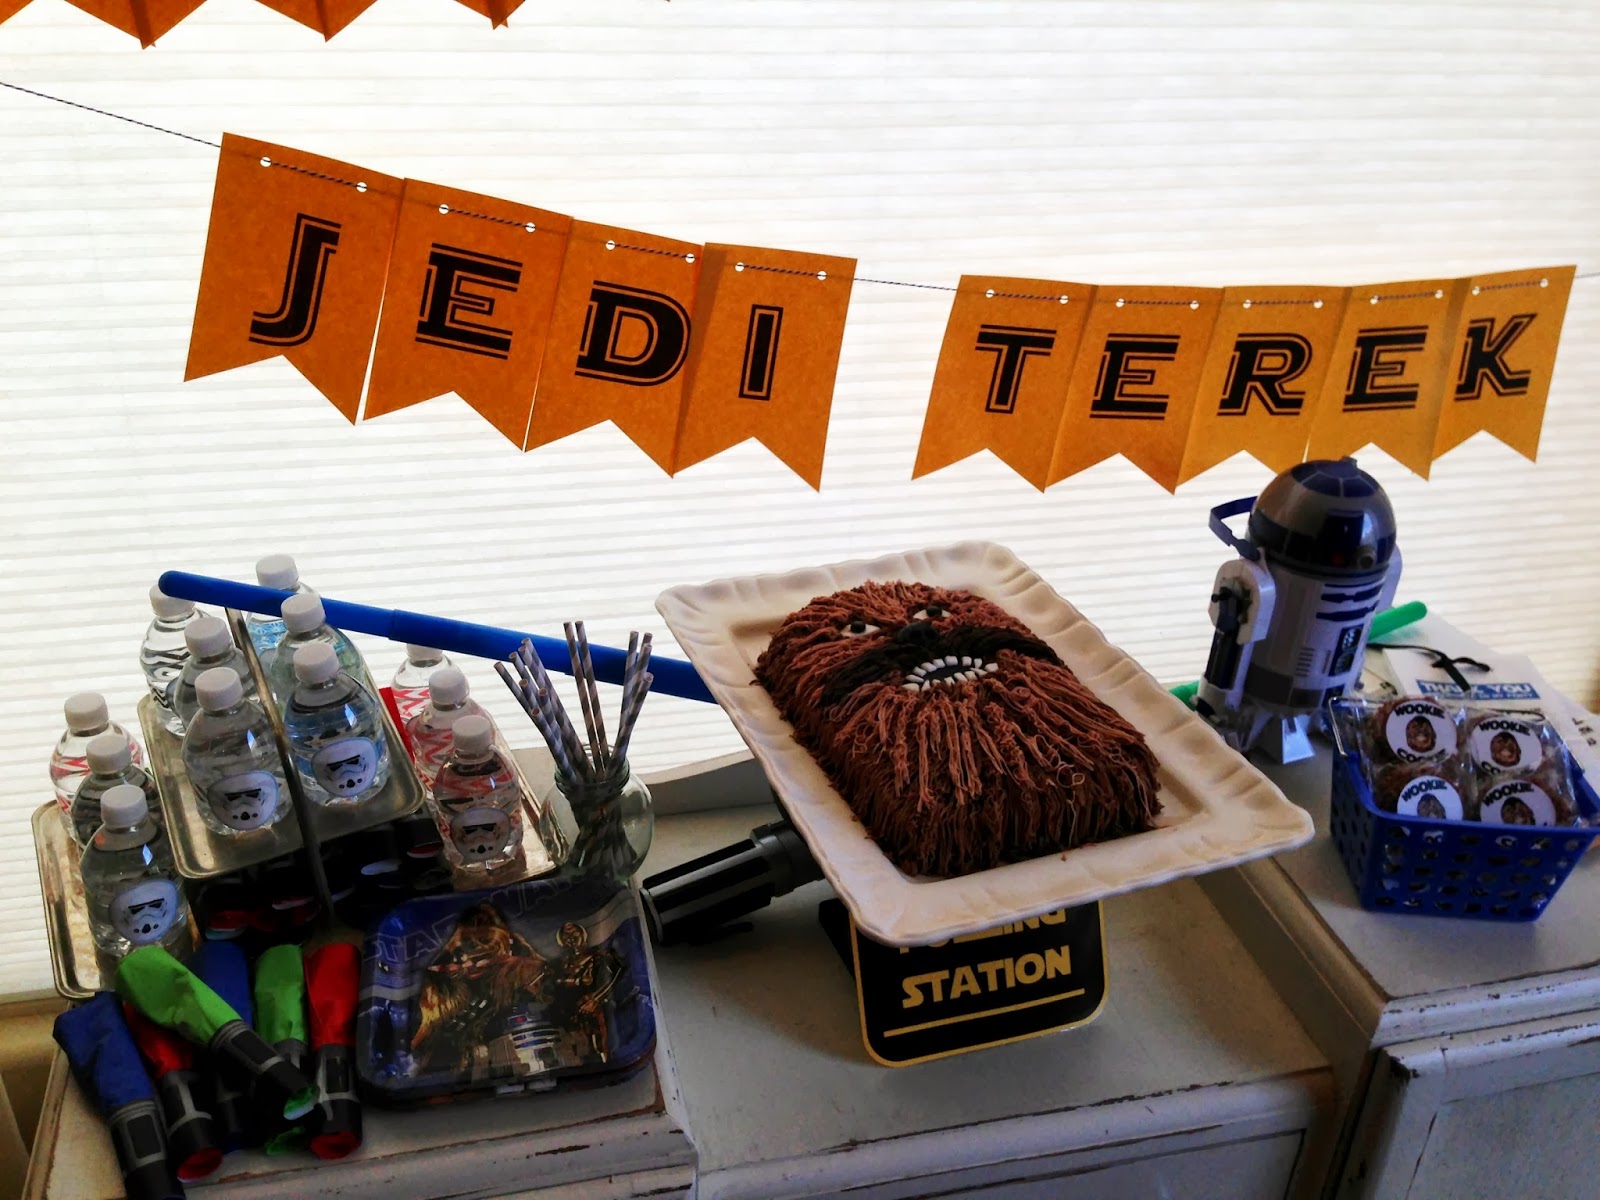
The cake was quite simple.  I got the idea from Cake Central.  I tried to pick an easy one.  I baked a 9x13 rectangle cake.  I frosted it with brown frosting.... I used the tip that has several small holes and just piped the fur on... I didn't care if it looked all perfect.  I used two different colors for the fur and a darker brown for the mustache.  I made the eyes, nose and teeth out of fondant (I keep small amounts of different colors of fondant in my freezer for things like this).
The plates were from Walmart.  The straws were from Pick Your Plum.
The water bottle labels were a free printable from Clean and Scentsible.
The napkins holders were a free printable from Catch My Party.
I got the idea for the "Wookie Cookies" from Craft, Interrupted.
Down the center of the table where the Jedis ate, I put my son's plastic Star Wars figures along with yellow sparkle stars I had cut out with a star punch.
I put my hubby in charge of the piñata.  He did a great job.  I showed him the idea I had pinned from the Thriftress.... but then he searched some more and put together several ideas.
We had the Jedis hit the piñata with a light saber...until we got worried the light saber would break.
The party favor bags were printed on white lunch bags.  I took the Jedi Knight certificate from Libby Grove Designs and edited it in Photoshop to say "Thank you for Coming to my Party."  The kids put their wookie cookie in the bag along with their candy from the Piñata. 


Wednesday, October 2, 2013

Welcome to the Jungle {safari pack meeting}

I love the leaders we have in cub scouts!  They are awesome! I am in the Primary Presidency in my ward.  I am the person who oversees the cub scouting program.  I have a son in cub scouts and I want it to be fun!  So, last night, my cubmaster and assistant cubmaster came up with a jungle theme for our pack meeting.  We had a lot of awards to give out... including 2 arrow of light awards.
 So, we (my friend Haley and I) started by decorating the room to look like a jungle.  We took rolls of craft wrapping paper from the dollar store and cut them into 3rds.  Then we took the long strips and rolled them up to make the vines.  We cut leaves out of construction paper and hot glued them to the vines.
 Haley did a great job of accessorizing everything with the vines and adding jungle stuffed animals.

We had a cheesy skit from a safari powwow book that we had in our cub scout stuff.  The skit had us going through the jungle and finding bobcats, wolves, bears, webelos, etc.  At each stop, the awards were given out.
After the awards, I had the kids (cub scouts and siblings) make binoculars and go on a treasure hunt.  I had painted toilet paper tubes black and hot glued them together.  The kids got to choose their duck tape color and tape the ribbon to their binoculars.
Then they took their binoculars and followed clues.
 Their clues took them to a room by the kitchen where my amazing Webelos leader, Jenifer, had an a cute table of safari food set up.
 My favorite was the gummy skewers.
And she had cute bags of animal crackers with labels on them!
It turned out so cute.  The kids had a good time and it was short and sweet:)

Monday, September 30, 2013

White Trash Party {family reunion}

I have to preface this by saying that my mother in law is one of the classiest people I know.   She's all about glitz and glamour.  I started trying to have a theme for our family reunion a few years ago.  Some of the family gets into it and some don't.  This year we were sitting around and talking about it.  One of my brother's in law suggested a White Trash Party... the thought of it was just too funny... It upset my mother in law so much that we had to do it.

We started by simply making the invitations on Trash.  I saved and cut up boxes and just hand wrote the info on the back.
For decor, I strung a clothes line with thermals and panty hose and such.  I borrowed pink flamingos from a friend and stuck those in the ground.  Pretty simple.  We stayed in small cabins, but some of the kids put up tents to sleep in.
We bought a new toilet seat and used it as a picture frame with a picture of my in-laws inside.  That got tons of laughs from people.
For centerpieces, I saved bottles... mostly root beer and teryaki sauce and such... but I found a beer bottle so I used that too.  I cut flowers out of the boxes and stuck them on wooden skewers and put a button in the center.
For pictures, I bought a white table cloth and drew lines for a mug shot background.
My brother and sister in law got into the theme and bought awesome clothes at the DI!  My brother in law even cut his hair!
And last, but not least, we had to have boob cupcakes!
We always have a good time at our family reunions... even if it rained on us almost the whole time.  But, seeing my mother in law's expression to all of my white trash decor (and especially the boob cupcakes) was priceless!


Friday, September 13, 2013

In loving memory {funeral crafting}

This summer was a difficult one for me.  My beautiful, sweet, caring mom passed away.  She had fought a 5 year battle with cancer... and her body couldn't fight it any more.  I miss her greatly.  She taught me everything I know about crafting, cooking, being a mom... and things I should have learned from her... already kicking myself for not having her teach me how to thread her serger!

I am her only daughter.  So, it was my responsibility to do all the "crafty" stuff for the funeral.  I set this display up outside the relief society room where we had the viewing.  I had found the desk at a yard sale for $2 about a week before the funeral.  I painted it turquoise (her favorite color)... my mom was trendy when she didn't know she was!   On the table we sat things that only her close friends and family would probably know about her.
She loved:
canning
genealogy
her collection of green dishes
"fake" coke
counting and naming cows at the ranch
romance novels
doris day movies
mints
she was born on flag day

Next to the table was my dress form with her favorite shirt... it was her "shopping" shirt.  My mom always wore that shirt when she would leave the house to go to the store or almost anywhere else.

On the left of the table is a frame that I gave her a few years ago.  It hangs in her home right when you walk in the front door.  It has a collection of 4x6 photos of her family throughout the years.

Most of all, she loved her grand kids.   Above the table I had a line of doilies with pictures of her with her grandkids.  They are attached with some chalk board clothes pins that I bought from Pick Your Plum.
That was mostly all we had to do as far as decor... the beautiful flowers that everyone sent were amazing!

My dad asked me if I would finish her scrapbook for her.

What I did, was take the book that we got from the funeral home for the guests to sign.  
I added the pictures from the funeral to that book.


We got a lot of cards for my mom's funeral.  My mom loves to save cards, so I couldn't throw them away.    I decided just to hole punch them and put them on rings to save them.  I took one of the cards that I thought my mom would like and used it for the cover.  I used the design that Maggie Holmes had used for a mini album class years ago as my design for the cover.
In her actual scrapbook, she had a section where she had saved all of the funeral programs and obituaries from loved ones over the years.  I felt that I needed to add her program and obituary to that scrapbook as well.
We were told my mom wouldn't last much longer a few days before her birthday.  So, this birthday was a hard one.... we wanted to give her something special... but not material.  My little brother nailed it... he got several birthday cards and had a bunch of her friends sign them for her.  I got her a flag with 63 stars.  She was born on flag day and she had told me a story about how her uncle would buy her a flag every year for her birthday.  He would get her a flag with the number of stars for how old she was.  Spending time with her was the best birthday present ever.

So, I added this page to her scrapbook as well.  

Now...I need to get back to my scrapbooks!  It's driving me crazy that I'm so far behind!

Thursday, September 12, 2013

Parade Floats are SWEET {giant candy}

Each year in our small town of Ivins, we have a parade to celebrate Pioneer Day.  Pioneer day is a religious holiday for the LDS church celebrating when the pioneers arrived in the Salt Lake Valley.   I am in the primary of our ward unit and we are always in charge of the float.  I volunteered to create our float this year (partly because I wanted it to be cute and fun, partly because I'm crazy and mostly because I also like to do a float for the 4th of July in Kanarraville.)  So, to kill to birds with one stone, I came up with an idea that would work for both parades.

For the 4th of July in Kanarraville, our float theme was "America is Sweet."
I found the ideas on Pinterest (here and here).  The ideas were originally for a candyland party.  

The first part of the float was the giant suckers made from pool noodles. To make the suckers, we took the pool noodles and glued them into a spiral using hot glue.  It took two people... one to hold and one to glue.  Them, I drilled a hole in the noodle large enough to hold a pvc pipe.  We stuck the pvc pipe in the noodle.  Then, we covered the suckers with cellophane and tied a ribbon on them.

The second part of the float was the large hard candies.  Those were easy.  We just bought the paper chinese lanterns and wrapped them with cellophane with a tie on each end.  

I ordered float fringe for the bottom of the float, but it did not arrive in time for the 4th of July... too much procrastination.  So, my cousin cut crepe paper and taped it along the bottom.

We had the kids sit on hay bales.  I covered them with some table cloths so they would not be too scratchy.  I just happened to have several table cloths that were bright and colorful and had candy and balloons on them.  It was from fabric I had purchased for $1 at a yard sale.

Here is the float for the 24th of July (Pioneer Day).  The theme was "Our Pioneer Heritage is SWEET."
For this parade, we had a lot more kids, so we needed a larger float.  I also added mesh to the sides to give it more color.  The mesh is the stuff that comes in rolls that you buy for Christmas trees... amazingly enough Hobby Lobby had Christmas stuff for sale in July.

I think it turned out cute and ended up being kind of fun... I guess.  But, I'm not volunteering next year... and our kids are just riding scooters or bikes in the Kanarraville parade:)

Monday, September 2, 2013

Art Supply Caddy

In the spring, I was asked to teach a class on DIY projects for organizing your home for my church's women's organization (Relief Society).   To tell you the truth, I'm not super organized... I'd like to be.  So, when I was asked to teach this class, I thought... "well, this will be my chance to make all of the things I've pinned on Pinterest."

I'm sure you've seen this art bin idea floating around Pinterest using toilet paper rolls.  I had seen it and loved the idea.  However, I wanted my kids to be able to take out just one of the containers if that is all they needed at the time.  And since I save all of my garbage, I had been saving up Crystal Lite containers.    I simple covered a shoe box with fabric.  I decorated it with washi tape, twine and a tag I had laying around.  Then, I also decorated my Crystal Lite containers with washi tape. (I have to tell you that the washi tape didn't stick perfectly.  I had to glue the ends on with E6000 glue to make then stay on.)  Most of my washi tapes have been purchased from either Pick Your Plum or Downtown Tape.
I love that the containers are clear so my kids can easily see what's inside.  I love that they can take out and use just the paint brushes or colored pencils or whatever medium they are using at the time.  And I love how cute it turned out!