Monday, July 27, 2009

July Product Challenge... Pompoms

We have started a new feature where every month we will give our readers a challenge. It may be a theme, product, pattern, etc. July's challenge was the product challenge of Pompoms. Here is a cute burp cloth that one of our readers sent in for the challenge.
Bonnie said,

"Hi:
My name is Bonnie Gonzalez (Puerto Rico). This weekend searching I found your blog and absolutly love it. This will be my first interaction with any blog.
I saw your product challenge and found it interesting "pom poms". I sent you a picture of a burb cloth I made for my daughter few years ago. I made it very simple with a kitty applique. I hope to see it posted in your blog. It will really make my day.
Thank you and will keep on reading.
Bonnie"

Thanks for sending a picture to us of your cute burp cloth!!! If any of our other readers out there have anything with pomspoms that they've made, we would love to see them!!! Just send them to our email at twiddlethumbs@rocketmail.com or send us a link to your blog.

I made a pillowcase dress for my niece that was trimmed with the pompoms. Love it!!!


Isn't she cute?:)
With the extra pompoms, I thought I make a page for my baby T. I love the hot pink pompoms and I don't even think it's too girly for a boy page!!!
-Anisa

Pre-school Mini Album

I don't know about this whole year-round school thing. For most kids on most tracks, school started today. My oldest will be in Kindergarten so he starts a week late. So, for the craft blog, I thought I'd post a mini album that I made for his last year of Pre-school. I had been wanting to do a mixed media mini album for awhile and this gave me the perfect opportunity.

I used my Cricut to cut out a template of the shape that I wanted the album to be. Then I simply traced the shape on acrylic, felt, chipboard and cardstock to make my pages.

My front page was acrylic with just a title and a few simple embellishments. Then I did a few pages of different type of products. I used quite a bit of stitching on the pages... and of course my favorite thing right now is gathered ribbon that is stitched on.


It turned out really cute and my little boy loves it!!!

To view the complete album visit our Flickr site.

-Anisa

Friday, July 17, 2009

Can't NOT scrapbook

A week of crafting would not be complete without the chance to scrapbook.... if I have a break from the kids, I can't NOT scrapbook. So, I thought I'd post a few of my layouts that I did.


I wish I would have been able to get a lot more done, but I had a little helper that kept me from doing everything that I wanted to do!!!


Wednesday, July 15, 2009

I had a DUH moment today!

I have a couple of lamps in my house with plain white lamp shades.... BORING!!! I have been wanting to jazz them up for awhile but I couldn't quite figure out what I wanted to do... until I saw this lamp in Pottery Barn Kids. How cute to have gathered ribbon or fabric on a lamp shade. So, I thought that I would literally have to sew the ribbon ONTO the lamp shade. Well, that's just not going to work (I tried it and it just doesn't work). So, I thought I would staple it on. The lamp turned out super cute, but that was the most frustrating craft I have done in a long time. Sometimes the stapler would work but most of the time I would end up poking holes in the lamp shade and putting the staple in manually.... don't try this at home.

So, I just gave up. I figured I put the other lamp shades aside and come up with some other idea some other time. I was done with the frustration. Then I was wandering down the lamp aisle at Hobby Lobby and I saw the same cute pink lamps. After I looked closely at them I realized.... DUH... they were sewn to gather the fabric, but it was glued on the lamp... DUH!!!
So, I busily got to work sewing strips of fabric down the middle and gathering them. Then I used my trusty hot glue gun and glued them on my lamp shade. So cute, so easy, I am so blonde sometimes, but I'm not blonde.
And look how cute my guest bedroom is!!!

Applique Tutorial

A few months ago our 1 craft 3 ways was applique.

I thought that it would be appropriate to do a tutorial on exactly how to do an applique.


1. Make a pattern of what you want to applique. I am going to applique a tie on my little boy's shirt. I just hand drew the tie, but you could trace an actual tie.
2. Trace the pattern onto an iron on product such as Heat-n-bond.
3. Place the Heat-n-bond onto the wrong side of the fabric.
4. Cut the heat-n-bond and the fabric down to a size that is a little bigger than your pattern. Then iron the heat n bond onto the fabric according to package directions.
5. Cut your pattern out and peel the paper backing off.
6. Iron the applique onto whatever you are attaching it to according to package directions.

7. Now comes the fun part. You need to sew around the edges to keep them from fraying. There are several ways to do this. You could use embroidery floss and do it by hand. I chose to use my sewing machine and do a zig zag stitch.

8 Sew all the way around and you are done!
I had bought this shirt on clearance at Old Navy for 97cents. It was kind of plain and I wanted to dress it up a bit. I wasn't sure if my 5 year old would like it or not. When I showed it to him he absolutely loved it! I think he will look so adorable in this with some tan pants. It totally looks like a grandpa tie.

Tuesday, July 14, 2009

I love Spray Paint!

Another project I thought I'd do this week was a chair for Cami. I had an extra chair, I had two cans of extra red spray paint and a yard of extra black and white fabric. Cami is decorating her craft room in reds and blacks and I thought this would be perfect since she needs another chair for in there!

I LOVE spray paint. I spray paint a LOT of stuff at my house. Our garage has several colors of paint on the floor and there is always spray paint dust on everything in our garage (including my husband's motorcycle... which he is NOT happy about.... come on, it washes off!) So, since I do this so often, I thought I'd give you some tips on spray painting....

1. Clean whatever your are going to paint. Just wipe it down with a wet cloth and let it dry.

2. Always use primer. I don't like to sand the stuff that I paint and sometimes when you're painting metal or plastic or other such things it's kind of hard to sand. But if you use primer, the paint sticks well and covers well. Most primers are white or gray. I usually use white if I'm painting something white and gray for all other colors. But the Smith's Marketplace near us sells black HD Designs brand primer that I love because I spray paint a lot of things black.

3. I paint in my garage with the door all the way open or part way open to let things ventilate.

4. Primer the top with a coat, flip it over, primer the other side. Then paint the other side with the paint, then flip it over and paint the top side.

5. It will usually take about 1 can of primer and 2 cans of paint for most pieces of furniture... like a chair or headboard.

6. Distressing is your friend! If you have paint runs or places that didn't get a good coat, just use your little electric sander or sand paper and sand off those places.

7. Finish your project with a clear coat to protect the places that you distressed.

*You can spray paint almost anything as long as you primer first. If you are doing a piece of furniture that has a lot of smooth flat surfaces like a dresser, table, bookshelf, etc, I wouldn't recommend spray paint. Spray paint will usually leave spray lines on things like that. I would use a small foam roller and brush to get in the corners. However, spray paint is great for things that have rounded parts or hard to reach in places.


Here are a few other projects I have painted since I moved into my new house...


This cute headboard to matchthis cute mirror in my guest bedroom.
Most of my kitchen chairs.

This cute chair goes in my craft room, but it is so cute I couldn't resist taking my baby's picture on it!


Monday, July 13, 2009

Cute Wall Decor

I am soooo excited about Hijacking the blog this week!!!!!


My two older boys are off to a gymnastics camp Monday through Thursday from 9:00 am - 1:00 pm. That gives me 16 hours of crafting with just my crawling baby:)


So, I thought I'd start by finishing up a project that I started way back in May.

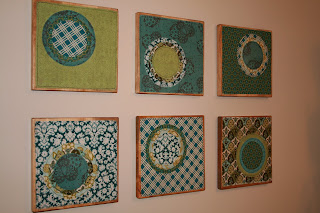
I went to a quilt store in St. George and saw this cute quilt that had layers of circles on it. I loved it!!! In fact it's on my list for a new bedspread in my room (my list is long). Anyway, I had some super cute fat quarters that matched the colors of my 1/2 bathroom. So I thought I'd do the same thing and then mod podge them onto wood squares.

My husband and I can't quite get up the ambition to do a lot of painting in our house so our walls are just light tan. This gave some great color to my bathroom. Here's a close up pic of one of the squares so you can see what I did.
I'm sorry I don't have a step by step tutorial with pictures, but I can kind of tell you what I did.

1. I traced out three different sizes of circles using one of my scrapbooking circle cutters.
2. I cut out squares just under the size of my wood.
3. I used Heat-n-bond to iron on the circles to each other and iron the circles onto the square.
4. I then sewed a straight stitch around the outsides of all of my fabric so it wouldn't fray too much.
5. The hard part.... I had to cut off tons of strings and any of the fraying fabric.
6. I cut out my wood.... 9" squares (or rather had the Lowe's people cut it out)
7. I stained the wood.
8. I mod podged the fabric onto the squares.
9. I had my husband hang them on the wall!!!