Showing posts with label fabric. Show all posts

Monday, November 25, 2013

Priesthood Preview

My calling in my church (the Church of Jesus Christ of Latter-day Saints) is in the Primary.  I work with the kids from age 3-12.  At the end of the year, we are asked to hold a special night for the boys who will be turning 12.  It is called the Priesthood Preview.  The boys listened to talks about the importance of the priesthood.  We had a musical number and then had refreshments.

I had seen ideas (and talked to people) about doing a "tie" theme.  So, I found an idea on Little Birdie Secrets for a shirt and tie invitation.  
Then I got to work on the decor.  I wanted to make a tie banner.  I was debating on making it out of paper ties.  But, when I got on Pinterest and did a little searching, I came across this tie wreath... and I had to make it!  I asked friends for ties and got WAY more than I needed.  

To make the wreath, I simply cut a circle out of a cardboard box... I'm cheap.  Then, I cut the tied and hot-glued them around the wreath (overlapping slightly).  I tied one tie in a boy and glued it on.  Then glued a string on the back to hang it. 

To make the banner, I used the left over tied and cut them in half.  I cut the cut off tie back into a point and hot-glued the layers together.  Then, I folded over the top half and sewed it so that I could easily slip the ties onto a ribbon.
We thought it would be a great idea to just serve donuts and hot chocolate for refreshments.  I wanted the Oath and Covenant of the priesthood displayed but couldn't find a poster.  So, I wrote it on the chalk board!
 I also had some left-over Halloween candy that I put in glass jars... with a small child's tie around one of the jars.
We have a great group of boys!!!


Saturday, March 23, 2013

Spring is in the Air

It has been so nice and warm down here in Sunny St. George (until today).  So, my real purpose in this blog post is to make my South Jordan friends jealous of our nice weather.  And to prove that I can actually finish a project.  I have been working on my front porch for awhile... and I finally got it done!

Here is my (Southwest, St. George style) house.  Not at all the style of house I would choose.  But, I love my neighborhood and the friends I have here, so I'll take it for now.  As you can see, there is a cave that goes back in to our front porch.  The left front of the house is a Casita (mother-in-law apartment) that is 90% my craft room and 10% my husband's office.  The right is the garage.  And behind all of that is our house... the part we live in.
As you head back into the cave, you can start to see our front porch.  
As you can see, there is space at the left for my bistro table.  And not a lot of space at the right.  It's not symmetrical... it would drive my mother crazy... and it drives me a little crazy too.  But, I've had the bistro table for probably over 10 years and I don't want to get rid of it.

Here's a close up of the bistro table.

 I picked up this green fabric at a yard sale and recovered some pillows.  I made the fabric flowers so that they safety pin on (I would like to change things up a bit for fall and winter).
 I've had the garden box forever... I'm thinking it may have been something I bought at Tai Pan.  Its filled with flowers, garden tools, gloves and some styrofoam covered fabric balls.
 I picked up this metal stand a few weeks ago at a yard sale for $10.  I was so excited about it!  It matches my bistro table perfectly.  The plant pot was also something I picked up at a yard sale.  My favorite igloo cooler was a vintage find from a yard sale as well.  It's metal and I was so tortured as to weather I should paint it or not.  But after talking to the paint department at Lowes, they told me that I would be able to remove the paint, so I went for it.  And the rain boots were something my husband picked up for me at a rental house... and I spray painted them pink!
 I've been loving all of the yard wrapped stuff on Pinterest, so I went ahead and make a wreath.  It was a pain in the butt, but I love it!!!  I added some flowers with pins in the middle so that I can take them off later.  And I have some fabric letters clipped on with mini clothes pins so I can remove them too.
 And even though today was one of the coldest days in awhile, I finally got all of my pots planted.  I've had these pots for a few years, but they needed an update... turns out turquoise spray paint was perfect!
My goal is to finish some projects... most of my rooms are 90% done, but they need some finishing touches!

Tuesday, November 6, 2012

Dining Room

Moving is sooo much work.  I don't know how long it will take me to get completely organized (ok, I probably never will).  One of the most fun things about moving is decorating.  I didn't want to post pix of my house until I got some things decorated.  Decorating takes time and money... so it will come slowly.
This is the fabric that I chose for my living room, dining room and kitchen.  I was looking for something with black and brown because my furniture is black and brown.  I also really wanted something with turquoise.  The other colors just happened.  I love the purple and green... it's different than what I'm used to, but so fun.  And I really am tired of red.  It was on clearance, so that's a huge bonus!  
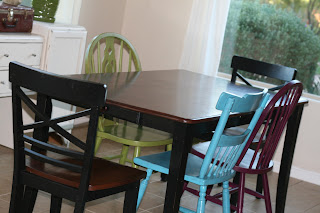
Here is my dining room.  It's probably the most used and most looked at room in my home...(I stare at it  while I'm cooking.)    I've had the dining table for several years.  But I had to spray paint the chairs.  That is one of my favorite parts.  
I have always loved this look of mis-matched chairs from my favorite TV show Friends. 
So I got to work painting my own chairs.  One green, one turquoise and one purple.  Technically I need one more chair, but I haven't found one at a yard sale yet.  Plus, we only have 5 people in our family.
 I made the curtains and bought the rods at Ross.  I had the dresser in my craft room years ago.  I've been using it in my boys room, but it was way too girly!  Even though it's in front of the window, I love it!  It's the perfect place to put all of the kids coloring books, and coloring supplies.  As well as their homework.

Most of the accessories on top are garage sale treasures.  Of course, I spray painted the balls on the bird baths.

I think I pulled everything together nicely.  I do need to make a table runner for the middle of my table and some sort of bowl with balls for the center as well.  What do you think?  A table runner out of my fabric, or doilies painted in the colors of my fabric?  Also, do you think I need to hang anything on the walls?

Sunday, June 3, 2012

Granny's Cottage

I've been super busy.... and I'm getting way behind on my scrapbooking:)  Seriously, I'm a year behind and it's killing me!  Here's a little snippet of one of my MAJOR projects.  
My cousin (Libby) and I have taken upon ourselves the project of our Grandma's house.... we call it Granny's Cottage.  We've had a death in our family that has made this house vacant.  We'd love to keep the house, but it's really a money pit.  Our grand plan it to make it a vacation rental.  We've been cleaning, painting and decorating.... it's been a major undertaking.  One of the biggest problems was that the house wasn't kept clean.  Another problem was that when our family painted the house, they were very "efficient" and painted everything one color.  This turquoise room was turquoise... the walls, ceilings, trim, doors, everything... even the hinges and door knobs because, heaven forbid anyone should tape anything (okay, I'm off my soap box).  This is the first bedroom that we feel like is finished.  We have been trying to be as cheap as possible.  So, we've tried to use fabric and things that we already had. 
The back throw pillow with the pompoms was made with fabric my mom had in her stash... I love it!  Libby made the cute orange one with fabric she had in her stash.   My idea for the front pillow was kind of a combination of this pillow and this shirt.  I had the brown fabric only scraps... so I wanted something that used little of that fabric.
What's a cute cheap decorating idea?.... a bunting!  I used my map scraps and my fabric scraps. I got the idea from Dottie Angel.... super cute vintage stuff.
I already had a lot of embroidery hoops on hand from my previous craft room.  They were just sitting in a box, so I pulled them out!  We added a few more so that we could have some of the fabrics we had used in the room.  Always a super cheap and easy way to decorate a room.
This dresser was an awesome vintage find that we already had in Granny's house!  I love it!  I love the worn vintage look and I love the orange handles.  Libby wants to paint it, but I won't let her:)  The top is really quite worn, so I made this cute table runner out of doilies... got the idea here.  I wish I would have taken a better picture of my doily table runner for you:)  Libby had the vintage art from her Grandma's house.  And Libby and I have been collecting the white milk glass from yard sales and DI.  I don't know if we are going to put anything in it or not... I guess I should at least get candles:)
Now, back to my original picture of the whole room.... Don't you love our vintage bed?  This was one of the treasures that was already in Granny's house:)  Libby had the awesome afghan from her grandma.  Libby got the night stand at DI and painted and glazed it.  I found the awesome vintage lamp at a yard sale, of course!  And no night stand for a vintage room is complete without a doily:)  I made the curtain out of an old sheet and a few fabric scraps we had left.  

This has been a rather fun project for us, but very time consuming!  I'll keep posting as we get more rooms finished:)

Tuesday, November 15, 2011

The "Scientest is in"

I finally finished the science room!!! Well, it's been a few weeks, but I finally cleaned and took pictures of the science room. My little scientist loves it. To complete his room, he made himself a super cute sign for the outside of his door... I love it!!!
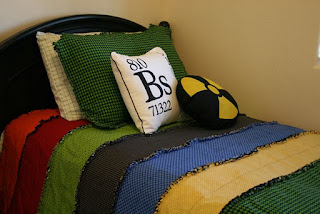
My main objective was just to have bright colors... I think I accomplished that with his bedding.
We had fun collecting a few things for the science shelf. He insisted on eyeballs and brains in jars. It worked out nice since it was Halloween. The molecule and flasks were things I had collected from teaching.
I haven't figured out what to put on his dresser. Right now it's just a place for him to collect his junk.... or display his Lego creations and Lowe's crafts.
I love magnet boards so my kids have a place to display their artwork. And I wanted to have a place for them to hang things... like jackets, library bags, etc. I even found a fun old telescope at a yard sale.
I love how it turned out and my little scientist does too! Most of the time, the under-bed bins full of Legos are out and all over the floor:)

Wednesday, November 9, 2011

Repurposed T-shirt Ruffle Scarf Tutorial

Do you want to know how to make the easiest scarf ever??? And super cute, I might add. And super cheap, I might add.
First things first, you MUST buy a gathering foot. (You don't really have to buy one, but it will make your life much easier. I would suggest ordering one online. They are different prices depending on the brand... anywhere from $5 and up. Totally worth the price. I got the original idea for the scarf from MADE. Let me just say, that I tried making this scarf a number of methods. I tried elastic thread, gathering by pulling the bobbin thread, gathering by hand... the list goes on. Using the gathering foot it what made it super easy.)
Now, you could just go to a fabric store and buy about 1/2 yard of knit. I chose to cut up an old t-shirt. The reason I chose knit was because I didn't want to have to hem anything... I was trying to make it super easy. I cut my scarf into strips about 3 inches wide. You can really do any width you want. I have done anywhere from3"-6" wide. I like all of the different widths and it makes them look a little different. Because I was cutting up an old t-shirt, I needed it to be as narrow as possible.
I took all of my pieces of fabric and sewed them into one long pieces using the regular foot on my sewing machine. You will want your piece to be between 4 and 5 yards long. I know it seems ridiculous for it to be that long, but once it's gathered, it won't be!

Okay, now put your Gathering Foot on your sewing machine. There are a few tips and tricks involved with a gathering foot. One of the things is stitch length. The longer the stitch length, the more it will gather. I had my stitch length at 5... that is the highest it would go. The second thing is the thread tension. The tighter the tension the more it will gather. I had mine on about an 8. However, the other thing that you need to realize is the thickness of the fabric. The thinner fabric will automatically gather more. So, you are good with a stitch length of about 5 and a thread tension doesn't need to be too high. But when you get thick fabrics, you need to turn the thread tension up higher. I would suggest messing around with the stitch length and thread tension on some scraps until you think you have the amount of gathering correct. If it gathers too much, you will have a really short scarf.

This is where the miracle happens. You just start sewing down the middle of the scarf with the gathering foot and it gathers the scarf up for you. I back stitch at the beginning and end and snip the threads and I'm done!!
It is so dang cute!!! I love it and my growing collection of scarves. I will probably never wear them... because I'm not much of an accessories kind of gal, but I think they are so cute.
So, if you don't have a gathering foot, get online and order one. And while you're waiting for it to ship, start cutting your favorite t-shirt up into 3" strips!!!

Leave a comment if you have any questions.

-Anisa

Tuesday, October 25, 2011

Bunting Valances

For the boy's bedrooms, I thought it would be fun to make a bunting in place of the window valance.

For the science room, I made the bunting out of fabric scraps left over from the quilt. I made squares that were elements on the periodic table. I printed them on iron-on fabric and ironed them on. Then I sewed around the edges. I sewed the squares onto some black binding that I had on hand. My little scientist loves it!!!
For the superhero room, I made a bunting out of several different superhero symbols. This bunting was made out of cardstock. I printed the symbols and traced them onto the cardstock. I then laminated it. I punched holes in the corners and threaded ribbon through it. My boys love it and it was a great way to incorporate many superheros.

To attach them to the wall, I simply used a thumb tack... nothing fancy.

Stay tuned for more bedroom re-do projects:)

-Anisa

Friday, October 21, 2011

The Science Bed

My little scientist thought it would be fun to have a Science Room. I thought it would be fun to make it super colorful!

I started with my favorite craft... framed silhouette art. I still love this super easy and inexpensive way of decorating.
I had a lot of fun with the throw pillows. For the square pillow I took the idea of an element from the periodic table. But instead of using the letters and numbers of a real element, I used letters and numbers associated with my son and his birth. For the circle pillow, I appliqued a nuclear symbol.
I made the bedspread. My original plan was to make a flannel rag quilt. I went searching for flannel, but I didn't really like anything that I was finding. So I decided to make a rag quilt out of cotton. I used black for the backing so that all of the cut edges have black in them. I love the way that it turned out.
I love the black with all of the colors. I am having so much fun with the science room. I am almost done with the whole thing and will post pics of the whole room when I get it finished!
Anisa

Sunday, October 16, 2011

No Sew Fleece Pillow Tutorial

I've been busy redecorating my boys' rooms... in and amongst all of my other craft projects. I'm getting close to being done so that I can post the final pics, but I thought I'd throw in a quick tutorial.

We've all seen the no sew fleece blankets. They've been around for a few years. (My oldest had a few as a baby, but he chewed on the tassels like a little dog... gross...so I had to take them away from him.) Anyway, my mother in law made my boys no sew fleece pillows a few years ago. The boys have loved them, but they no longer match their room. So, I decided to make them new ones. I took them to the fabric store and let them pic out their fabric.
The first thing you do is to cut your two pieces of fabric 8 inches larger than your pillow form. I had a 16" pillow form, so I cut my fabric squares 24"x24".

Because I like to do things as quick as possible, I kept the two pieces of fabric layered on top of each other so that I could cut both pieces at the same time.
You need to cut a 4" square out of each corner.
Then, go around the edges and cut strips about 1" wide by 4" long. I used my rotary cutter and it went super quick!
Last, put the pillow in between the layers of fabric and tie the tassels together.
That's it!!! These were so fast. I think I made both of them in about 30 minutes... but I may be exaggerating a tiny bit.
They look great on their bed with the fun pillow shams that I appliqued. When I get the room completely finished, I'll take some pics of the pillow shams up close.