Showing posts with label flowers. Show all posts

Thursday, September 18, 2014

Book-themed Wedding {LDS reception on a Dime}

I have 3 boys... I'm never going to be able to plan a wedding.  So, when my cousin got engaged, I jumped at the chance to be able to decorate for her wedding reception.
 I was asked to decorate this wedding reception as cheap as possible.  The reception was held in an LDS chapel gym.  If you aren't familiar with the LDS faith, many people are married in the temple in the morning, then have a reception at the local church in the evening.   This couple actually had both the luncheon AND the reception in the gym.  So, in decorating, I had to plan on decorating for both.  I came up with the idea of a book-themed wedding.  Jessie loves to read and so does her husband Adam. I did a lot of shopping at yard sales and thrift stores and did a lot of borrowing as well.
Jessie and Adam chose the colors of royal blue, silver and peach.   The centerpieces were different for every table.  They all involved a royal blue frame, a grouping of books, flowers and usually some sort of glassware.  We used white table cloths which we were able to get from a linen company for free (family owned).  We were able to borrow silver overlays for the tables and silver chair ties from a friend of the family.
 The flowers were mostly purchased from the Dollar Tree (to be honest, I couldn't find peach flowers any where else in St. George).   I bought all of the frames at yard sales for $1 at the most.  The spray paint was the expensive part, but I only think I used 3 cans for everything I painted.  I bought most of my books for 50 cents or less from thrift stores and yard sales.
 I had a lot of glassware, milk glass, candle sticks, etc.   I used what I had and bought anything I liked at yard sales and thrift stores.  I also borrowed a few things.   I bought peach and royal ribbon at the Joann or Michaels.  We used silver and blue mints on several of the tables as well.
I found small peach flowers on clearance at Tai pan and was able to get foam balls at the dollar store to make peach balls for the glass dishes.  I lucked out and found 16 small frames at a yard sale for $2.  I painted them silver.
In the entry to the gym, we had the guest book table.  I actually got the table for $5 at a yard sale and found the silver paint on clearance at Home Depot for $2.50.... score!  On top of the table, I made a paper table runner.  I taped book pages together on the back side.  Then I used this lace Martha Stewart punch to punch a lace trim all along the edge of the book pages.  The items on the table, were picked by the bride and groom.  They wanted their favorite books and their Dr. Who cookie jar.  They also wanted advice cards to go in the cookie jar.  Their guest book was made by Jessie's cousin, Sally.  I made the flower pens.  
I made the advice cards and a sign to let people know they needed to write advice.  They are a free download here and here.
Behind the table I made a "dates" chalk frame.  The frame was something I had picked up at a yard sale and painted silver.  The chalk board was from Home Depot... already painted with the chalk paint.  All I had to do was have my hubby cut the wood to fit the frame.  Then, I had to write on it in chalk.
 Along the wall when guests walked in, I had a photo display.  I hung white paper doilies with a photo in front of them.  They were hung on silver twine with silver glitter clothes pins.  I had the twine, bought a few doilies and found the glitter clothes pins on clearance at Joann.  I also made a banner that said "Once Upon a Time" out of the same Harry Potter book I used for Brenner's Harry Potter Birthday party (Jessie and Adam both love Harry Potter).  I had lace for the banner, and the book.  I only had to buy the scrapbook paper to cut out the letters.. and even some of that I had already.
The dresser itself was one I have in my dining room.  I already had most of the silver frames at home, or I picked them up from yard sales.  My sweet hubby cut out the book letters for me.  I had a scrap of chalk board left from the "dates" sign and I happened to have a frame that it fit in, so I used that to make a sign with their last name.
 We made a very simple backdrop for the happy couple.  During the luncheon, the couple and their parents sat at these tables.  During the reception, we took the tables down and the couple stood in front of the back drop.  The backdrop is just music pages taped to the wall.  I made the peach swag out of scraps of satin, ribbon, tulle, etc.  They are just looped over the ribbon.  Then I  made the other banners by folding the doilies over the twine and sticking them together with a glue dot.   Some have a flower attached too.
 My hubby also cut out these book letters.  The vase behind the ampersand was to hold her bouquet.  There is also another paper table runner on this table.
The other side of the gym was the serving table.    I used books stacked up with trays and platters on them.  I also put any other decor I items I had left over that we didn't use on the table.  The banner above the food table said "Happily Ever After"... food brings happiness, right? And there was nothing I could really do about the ugly blue curtain on the stage.
The photo booth was very similar to the couples backdrop... without the peach swag.  We used dictionary pages taped to the wall.  And we hung a frame from the basketball hoop above with twine.
 Next to the booth was a little dresser with the photo booth props in a vase and a sign I made in photoshop.
We used a hashtag so that we could easily search pictures people posted on social media.
And here I am with all of my girl cousins on the Williams side of the family.

Now... let's talk about organizing!  I am a school teacher.  Jessie got engaged at the beginning of the summer and her wedding was at the end, so it gave me the summer to work on the wedding.  However, she got married the Saturday before school started.  So, not only did I have to decorate for a wedding reception, but I had to set up a brand new classroom... super stressful week.  I knew this would be stressful and that I would probably have to rely on other people to do the actual set up.  I had to be super organized.  So, I (and my cousin Libby, the bride's sister) put all of the centerpiece groupings together ahead of time.   We took pictures of each center piece, labeled the pix and packed them in a labeled box.  

I also drew pictures of the gym with the layout of how I wanted to tables set up.  Everything was in a binder with the supplies they needed to set up.  While I was working all day Friday before the wedding, several people went to the church and had almost everything set up before I got off work.

Another great organizing tip, we actually not my idea.  Jessie lives in Salt Lake and I live in St. George and the wedding was to be in St. George.  So she set up a facebook group to plan the wedding.  Every idea that I had, I could post on the facebook group so she could see pictures of it and tell me her opinion.  That worked out really nice.

All in all, I think it turned out nice.  Yes, there are things I would have done differently, but it was a nice wedding on a shoestring budget.  I didn't completely add everything up, but I would say all of the decor came in under $150.... not that's amazing!

Also, I claim to have done everything, but my cousin Libby helped a lot and also my friend MinDee.  Thanks you two!!!

Oh, and I want to thank my friend Brandy for the pix!  She was the photographer for the wedding.  The pix that look good in this blog post are from her... the crappy ones are from my cell phone... lol.  I was too busy to get out my nice camera to take pix.

Wednesday, April 3, 2013

Gift Card Bouquet

My brother-in-law got remarried over this past weekend.  What do you give to someone on their 2nd wedding???  The best I could come up with was a gift card.  I didn't want to just give them a gift card..... I wanted to make it cute.  I talked with most of the rest of the family and I got them on board too.  

I used my Cricut Designer's Calendar cartridge and cut out tulips that were 4".  I cut out two for each flower.  I glued them just on the sides and bottom with a wooden skewer inside.  That left the top open for the gift card to slip inside.  I then just stuck them in a vase with some twine tied to the vase and a tag.  It turned out really cute and was a fun gift idea.


Saturday, March 23, 2013

Spring is in the Air

It has been so nice and warm down here in Sunny St. George (until today).  So, my real purpose in this blog post is to make my South Jordan friends jealous of our nice weather.  And to prove that I can actually finish a project.  I have been working on my front porch for awhile... and I finally got it done!

Here is my (Southwest, St. George style) house.  Not at all the style of house I would choose.  But, I love my neighborhood and the friends I have here, so I'll take it for now.  As you can see, there is a cave that goes back in to our front porch.  The left front of the house is a Casita (mother-in-law apartment) that is 90% my craft room and 10% my husband's office.  The right is the garage.  And behind all of that is our house... the part we live in.
As you head back into the cave, you can start to see our front porch.  
As you can see, there is space at the left for my bistro table.  And not a lot of space at the right.  It's not symmetrical... it would drive my mother crazy... and it drives me a little crazy too.  But, I've had the bistro table for probably over 10 years and I don't want to get rid of it.

Here's a close up of the bistro table.

 I picked up this green fabric at a yard sale and recovered some pillows.  I made the fabric flowers so that they safety pin on (I would like to change things up a bit for fall and winter).
 I've had the garden box forever... I'm thinking it may have been something I bought at Tai Pan.  Its filled with flowers, garden tools, gloves and some styrofoam covered fabric balls.
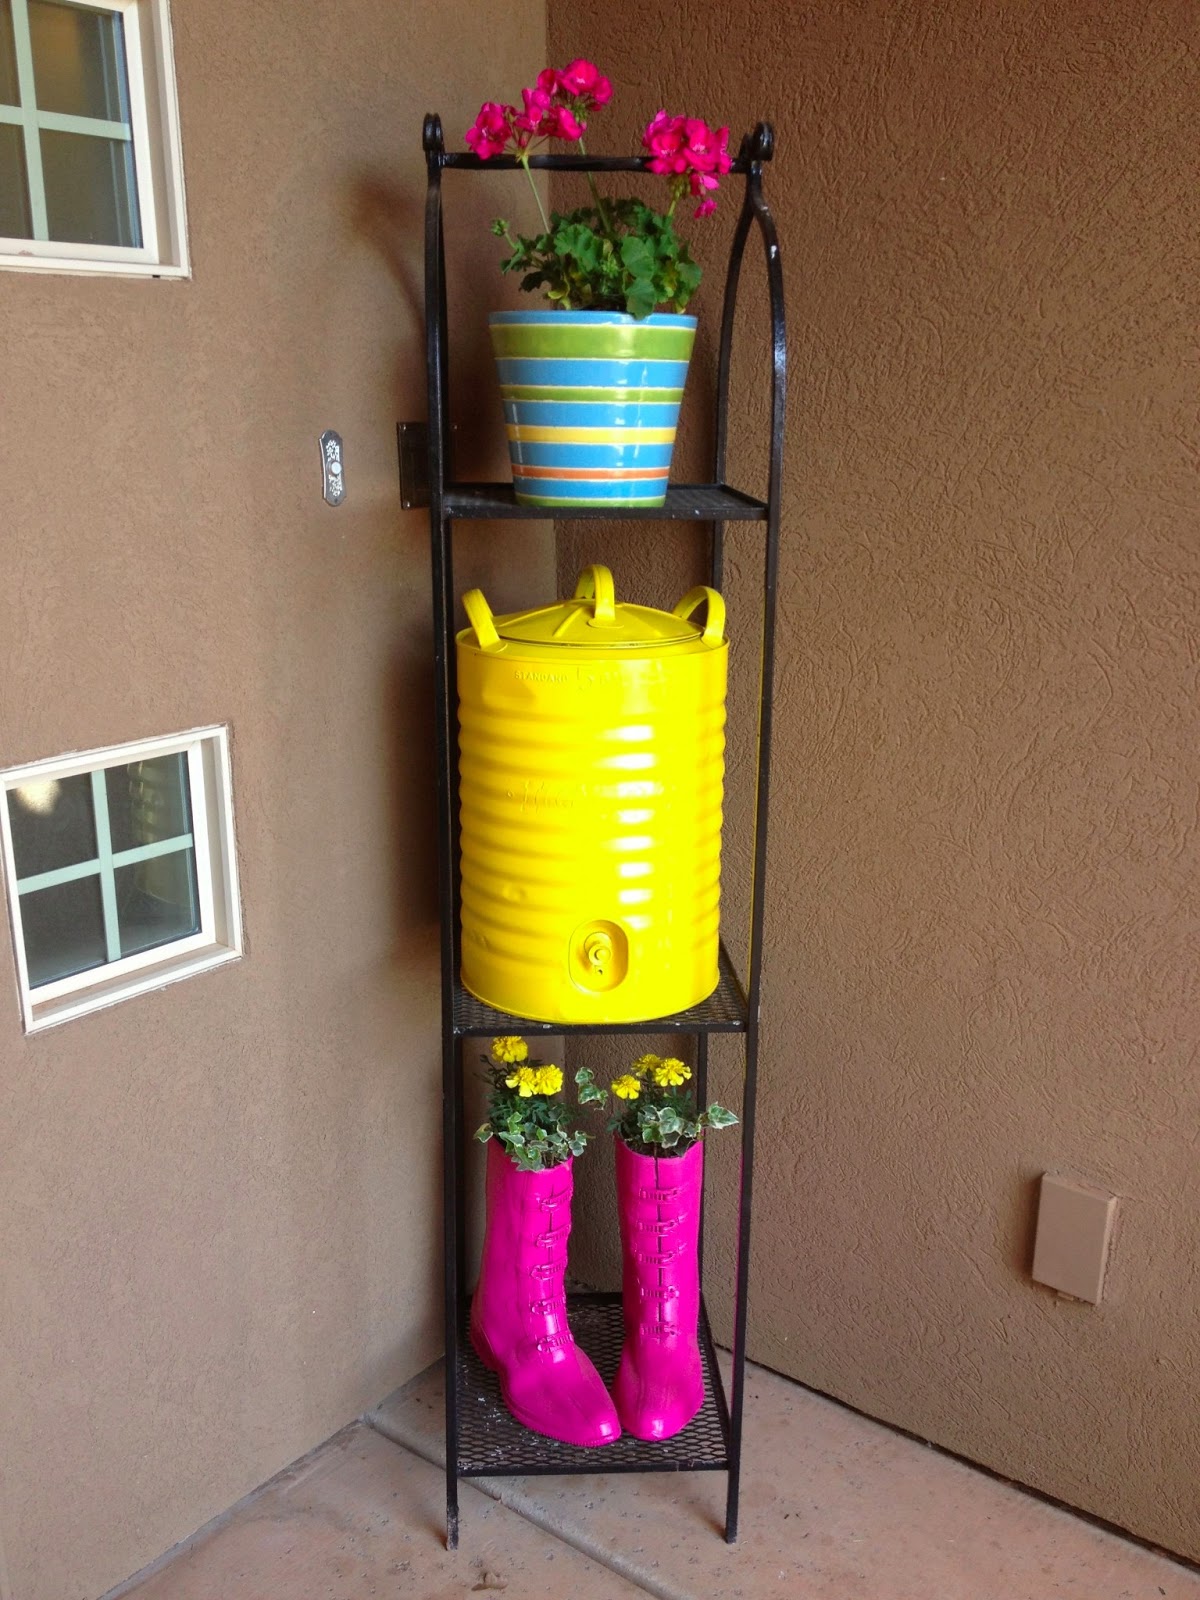
 I picked up this metal stand a few weeks ago at a yard sale for $10.  I was so excited about it!  It matches my bistro table perfectly.  The plant pot was also something I picked up at a yard sale.  My favorite igloo cooler was a vintage find from a yard sale as well.  It's metal and I was so tortured as to weather I should paint it or not.  But after talking to the paint department at Lowes, they told me that I would be able to remove the paint, so I went for it.  And the rain boots were something my husband picked up for me at a rental house... and I spray painted them pink!
 I've been loving all of the yard wrapped stuff on Pinterest, so I went ahead and make a wreath.  It was a pain in the butt, but I love it!!!  I added some flowers with pins in the middle so that I can take them off later.  And I have some fabric letters clipped on with mini clothes pins so I can remove them too.
 And even though today was one of the coldest days in awhile, I finally got all of my pots planted.  I've had these pots for a few years, but they needed an update... turns out turquoise spray paint was perfect!
My goal is to finish some projects... most of my rooms are 90% done, but they need some finishing touches!

Tuesday, July 31, 2012

Baby "Shower"

My two youngest sisters-in-law are having babies!!!  Both in September.  One is having a boy and one is having a girl.  I'm super excited to have babies in the family!  And I'm having fun making baby gifts and planning showers!
Shower #1 for baby girl was this past weekend.  I LOVED this idea of a "Shower" themed baby shower.  I pretty much copied what she did, but added a few minor details.... and took out a few.
 Here are my invitations... pictures don't do them justice.  The cloud is a shimmery paper.
 Here is kind of an overall picture of the table set-up.  We had it outside in my sister-in-law's back yard.
 We hung rain cloud (tissue paper pom poms) from the arbor above her patio.
 This umbrella is a vintage umbrella that my grandma had.... It was actually the reason I wanted to do the "shower" themed shower.  The original ruffle was white and was quite dingy.  So, I unpicked the ruffle and attached a new ruffle.  My sister-in-law had made these pink coffee filter poofs for another shower, so we stuck them in the umbrella.
 We made watering can centerpieces and used them to mark the path into the back yard.

I loved this idea of centerpieces out of rain boots.  I borrowed boots from some of my friends that have girls.  They turned out so adorable!!!  We punched the flowers out of solid and patterned papers and had them in varying sizes.  We put buttons in the center.  Then we hot glued them back to back onto the wooden skewers.
 This is what the table looked like when it was the food table.  The Partyland near my home sells sixlets candy in solid super fun colors. I had my mother-in-law put those in cute glass containers.  We had a pasta salad and rolls from Texas Roadhouse:)
I couldn't resist the cute striped straws.  They are so adorable.  I would have had us drink out of mason jars, but we were travelling almost 300 miles for this shower and I didn't want to haul the mason jars in the car.
 Here is the dessert table.  My cute niece made oreo truffles covered in pink candy melts... yummy:)

I made the cupcakes.  I used the same shimmery paper to make the clouds for the cupcakes.  I found the sprinkles and wrappers at Michaels.  ( However I just ordered some super cute striped and animal print cupcake wrappers from Pick Your Plum this morning)
I used this White Texas Sheet Cake recipe for the cupcakes and they were super moist and super delicious!
I think the shower turned out great and we are super excited for baby Jennika to get here:)

Thursday, June 7, 2012

Berry Wreath Make-over

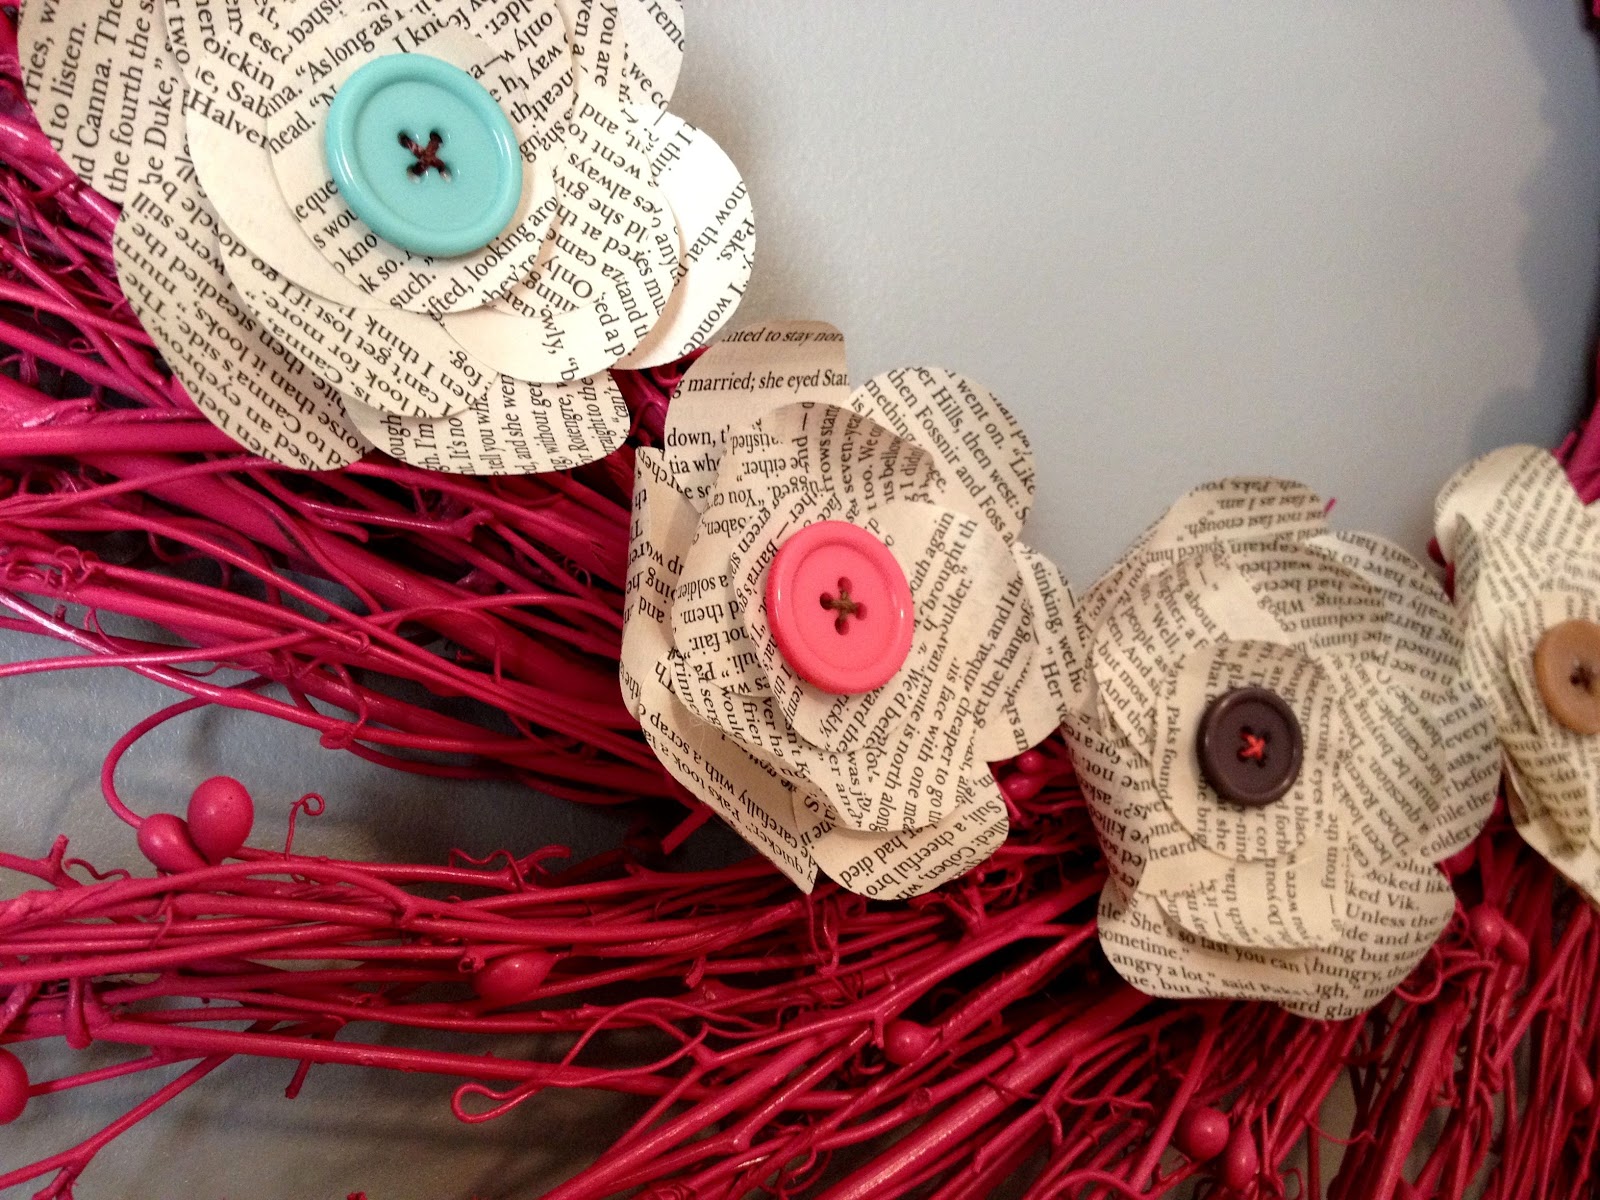
Do you remember these berry wreaths that were super popular a few years ago?  I'm not sure that they are going out of style just yet, but I thought I'd do a fun BRIGHT make-over with mine!

 First I sprayed primer on the wreath.  Then I spray painted it PINK!  (Just so you know, it takes a LOT of paint and primer... probably a whole can of spray paint to cover all of the branches!)
 Then I made paper flowers to go around the wreath.  I used this tutorial from Under the Table and Dreaming.  I used buttons in the center to add even more color.
Here's the final product!!!  I'm in love:)

Sunday, April 10, 2011

The UN-singed Flower Tutorial

So, I had a lot of fun with the singed flowers... and so did Brenner. However, the main reason I decided to try to make them was for my niece's baptism. I wanted to make her a pretty white flower to wear and so I thought I'd try a flower with the scraps I had lying around. However, when I went to buy white fabric, I got thinking, "these are going to be kind of ugly with burnt edges... it won't be pretty and white." The funny thing is that when I was in line at Joann's buying the fabric, the clerk asked me what I was making with the fabric. When I told her I was making flowers she told me to use my Heat Embossing Gun instead. I tried it out and it worked perfectly... no dark edges.

So, here is my tutorial on the UN-singed Flower
(the tutorial is not on the white fabric because white doesn't take great pics on a white table.)

1. Cut out your fabric. I chose flower-shaped, but you can also just do circles.
2. I used something to hold my flower down... I used a metal piercing tool, but you can use a pen or pencil or anything... just don't use your fingers or you will get burned. Use your heat embossing gun to melt and curl the edges. Don't get too close or they will curl up and shrivel up fast. You will want to kind of angle the heat gun so it blows from the inside to the outer edges.
3. You will end up with a lovely pile of flowers that are nice and curly and they don't have ugly black or burned edges.
4. Layer your flowers. I use tulle, but I did not heat it because it just shriveled up too fast. I left it how it was. Sew the layers together with just a needle and thread.
5. Add a button or beads. I sometimes sew the button on and sometimes glue it on.
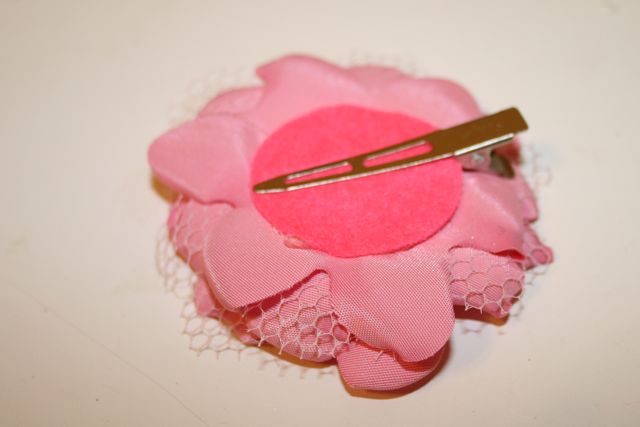
6. Cut a circle from felt so you can adhere your hair clip to the flower.
7. Put a circle of glue on the flower.
8. Stick the hair clip to the flower with the felt in between the tongs of the hair clip.

7. You now have a lovely gift to give to your niece for her baptism.....

or for whatever occasion you prefer... maybe I'll even be adventurous and wear one:)

-Anisa