Tuesday, November 22, 2011

The Jubilee of Trees

My mother in law is one of the directors for the Jubilee of Trees. Last year I got roped into helping a little. This year I got roped into helping a little more. My sweet hubby got roped into helping EVEN more.... it is his mother after all.

My mother in law is the Director of the Facilities Decor. However, this year she was also in charge of the "Festive Furnishings" booth... which is basically a craft booth.

I suggested making some fun 2x4 crafts. So, we made 30 of these cute green trees. My job was to cut and sand all the wood.

We also made 30 of the cute snowmen... (I cut and sanded the wood)
I got to paint a few more banners....
My sweet hubby got to help build a canopy or two....
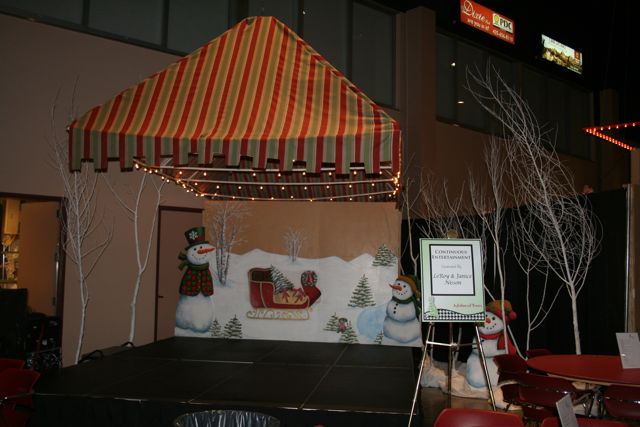
He also got to build walls....
And I must also include a picture of my mother in law's tree... of course my photography doesn't do it justice.
The whole place ends up looking AMAZING!!! But, I have to say, I'm kind of glad it's over and we can have time to focus on our own Christmas!!!

Tuesday, November 15, 2011

The "Scientest is in"

I finally finished the science room!!! Well, it's been a few weeks, but I finally cleaned and took pictures of the science room. My little scientist loves it. To complete his room, he made himself a super cute sign for the outside of his door... I love it!!!
My main objective was just to have bright colors... I think I accomplished that with his bedding.
We had fun collecting a few things for the science shelf. He insisted on eyeballs and brains in jars. It worked out nice since it was Halloween. The molecule and flasks were things I had collected from teaching.
I haven't figured out what to put on his dresser. Right now it's just a place for him to collect his junk.... or display his Lego creations and Lowe's crafts.
I love magnet boards so my kids have a place to display their artwork. And I wanted to have a place for them to hang things... like jackets, library bags, etc. I even found a fun old telescope at a yard sale.
I love how it turned out and my little scientist does too! Most of the time, the under-bed bins full of Legos are out and all over the floor:)

Wednesday, November 9, 2011

Repurposed T-shirt Ruffle Scarf Tutorial

Do you want to know how to make the easiest scarf ever??? And super cute, I might add. And super cheap, I might add.
First things first, you MUST buy a gathering foot. (You don't really have to buy one, but it will make your life much easier. I would suggest ordering one online. They are different prices depending on the brand... anywhere from $5 and up. Totally worth the price. I got the original idea for the scarf from MADE. Let me just say, that I tried making this scarf a number of methods. I tried elastic thread, gathering by pulling the bobbin thread, gathering by hand... the list goes on. Using the gathering foot it what made it super easy.)
Now, you could just go to a fabric store and buy about 1/2 yard of knit. I chose to cut up an old t-shirt. The reason I chose knit was because I didn't want to have to hem anything... I was trying to make it super easy. I cut my scarf into strips about 3 inches wide. You can really do any width you want. I have done anywhere from3"-6" wide. I like all of the different widths and it makes them look a little different. Because I was cutting up an old t-shirt, I needed it to be as narrow as possible.
I took all of my pieces of fabric and sewed them into one long pieces using the regular foot on my sewing machine. You will want your piece to be between 4 and 5 yards long. I know it seems ridiculous for it to be that long, but once it's gathered, it won't be!

Okay, now put your Gathering Foot on your sewing machine. There are a few tips and tricks involved with a gathering foot. One of the things is stitch length. The longer the stitch length, the more it will gather. I had my stitch length at 5... that is the highest it would go. The second thing is the thread tension. The tighter the tension the more it will gather. I had mine on about an 8. However, the other thing that you need to realize is the thickness of the fabric. The thinner fabric will automatically gather more. So, you are good with a stitch length of about 5 and a thread tension doesn't need to be too high. But when you get thick fabrics, you need to turn the thread tension up higher. I would suggest messing around with the stitch length and thread tension on some scraps until you think you have the amount of gathering correct. If it gathers too much, you will have a really short scarf.

This is where the miracle happens. You just start sewing down the middle of the scarf with the gathering foot and it gathers the scarf up for you. I back stitch at the beginning and end and snip the threads and I'm done!!
It is so dang cute!!! I love it and my growing collection of scarves. I will probably never wear them... because I'm not much of an accessories kind of gal, but I think they are so cute.
So, if you don't have a gathering foot, get online and order one. And while you're waiting for it to ship, start cutting your favorite t-shirt up into 3" strips!!!

Leave a comment if you have any questions.

-Anisa

Wednesday, October 26, 2011

Halloween Character Jars

I saw this cute idea in my most recent issue of Scrapbooks Etc. magazine. So I started saving my pickle jars, and any other kind of jar that I could find. I even asked friends to save a few jars for me.
Then I started spray painting lids all sorts of different colors. I made the characters that were in the magazine and I also came up with a few of my own. They turned out totally cute and I had tons of fun making them.
I think I'm going to use them as a centerpiece at my kids' halloween party. And I was thinking of giving them away as guesstimation jars.... whoever guesses closest to how many candies, wins the jar.

Tuesday, October 25, 2011

Bunting Valances

For the boy's bedrooms, I thought it would be fun to make a bunting in place of the window valance.

For the science room, I made the bunting out of fabric scraps left over from the quilt. I made squares that were elements on the periodic table. I printed them on iron-on fabric and ironed them on. Then I sewed around the edges. I sewed the squares onto some black binding that I had on hand. My little scientist loves it!!!
For the superhero room, I made a bunting out of several different superhero symbols. This bunting was made out of cardstock. I printed the symbols and traced them onto the cardstock. I then laminated it. I punched holes in the corners and threaded ribbon through it. My boys love it and it was a great way to incorporate many superheros.

To attach them to the wall, I simply used a thumb tack... nothing fancy.

Stay tuned for more bedroom re-do projects:)

-Anisa

Friday, October 21, 2011

The Science Bed

My little scientist thought it would be fun to have a Science Room. I thought it would be fun to make it super colorful!

I started with my favorite craft... framed silhouette art. I still love this super easy and inexpensive way of decorating.
I had a lot of fun with the throw pillows. For the square pillow I took the idea of an element from the periodic table. But instead of using the letters and numbers of a real element, I used letters and numbers associated with my son and his birth. For the circle pillow, I appliqued a nuclear symbol.
I made the bedspread. My original plan was to make a flannel rag quilt. I went searching for flannel, but I didn't really like anything that I was finding. So I decided to make a rag quilt out of cotton. I used black for the backing so that all of the cut edges have black in them. I love the way that it turned out.
I love the black with all of the colors. I am having so much fun with the science room. I am almost done with the whole thing and will post pics of the whole room when I get it finished!
Anisa

Tuesday, October 18, 2011

A few Scrapbook pages

I just thought I'd post a few scrapbook pages that I made a few months back... before I started on a million other projects and haven't had time to scrapbook. I'm trying to get them all finished so that I can get back to scrapbooking again.
I love the crossword puzzle paper... and I love circles:)

I love it when I get the chance to do anything girly... and with those shorts.... I had a great color palate!!!

Sunday, October 16, 2011

No Sew Fleece Pillow Tutorial

I've been busy redecorating my boys' rooms... in and amongst all of my other craft projects. I'm getting close to being done so that I can post the final pics, but I thought I'd throw in a quick tutorial.

We've all seen the no sew fleece blankets. They've been around for a few years. (My oldest had a few as a baby, but he chewed on the tassels like a little dog... gross...so I had to take them away from him.) Anyway, my mother in law made my boys no sew fleece pillows a few years ago. The boys have loved them, but they no longer match their room. So, I decided to make them new ones. I took them to the fabric store and let them pic out their fabric.
The first thing you do is to cut your two pieces of fabric 8 inches larger than your pillow form. I had a 16" pillow form, so I cut my fabric squares 24"x24".

Because I like to do things as quick as possible, I kept the two pieces of fabric layered on top of each other so that I could cut both pieces at the same time.
You need to cut a 4" square out of each corner.
Then, go around the edges and cut strips about 1" wide by 4" long. I used my rotary cutter and it went super quick!
Last, put the pillow in between the layers of fabric and tie the tassels together.
That's it!!! These were so fast. I think I made both of them in about 30 minutes... but I may be exaggerating a tiny bit.
They look great on their bed with the fun pillow shams that I appliqued. When I get the room completely finished, I'll take some pics of the pillow shams up close.

Tuesday, October 11, 2011

My new feet!

I'm giddy about my new feet.... I guess I am just naive when it comes to the world of sewing. I sew straight stitches and that's about it. I barely know that there's a zipper foot (I've never sewn a zipper on anything) let alone other cool feet!

Okay, so I would first like to introduce you to the wide gathering foot. This thing is amazing. It gathers for you! You put the foot on, put your fabric in and start sewing. Soon I will show you the awesome scarves that I'm making with this foot.
Second I would like to introduce you to the ruffling foot. Quite complicated looking and really quite even more amazing. This little foot will gather and pleat for you and sew it to the bottom fabric all in one fail swoop. It is perfect for making aprons and dresses and the like. When I get done making scarves, I'll show you what it does for an apron. I am in love!!!


So, the truth be told, I've been working on projects like crazy... but Pinterest has sucked away all of my time on the computer and I have not been blogging much. I have a lot of projects that are almost finished and I'll get pictures of them up very soon:)

Sunday, August 21, 2011

Batman Birthday Party

My baby is turning 3 today... I have mixed feelings. He is such a big boy... yet, he's still my baby. He LOVES Batman. So, we decided to do a Batman birthday party. Being the cheap person that I am (there's no way I'm paying $4 for a package of batman plates from the party store) and the fact that I love a craft project, I decided to make a lot of his party supplies.

I purchased the Batman Cricut cartridge from Ebay. Great purchase... only $14. With that, I started on the banner first. I also made a really cute invitation, but forgot to take a picture. I actually did splurge and buy helium balloons.
I made these cute treat boxes and water bottle labels with the Cricut as well. His birthday is Sunday, but we had the party on Saturday. So, I'm saving the cake for his birthday, but I thought it would be fun to make cookies for his party. I had an oval cookie cutter for the outside of the Bat symbol. Luckily, Michael's had started putting out their Halloween stuff, so I found a mini set of Halloween cookie cutters... bat included. I made chocolate fondant and dyed it black and cut out the bats.
And I refused to pay $20 for the Batman piñata at the party store (it's bad enough having to buy the candy). We just simply paper machéd a balloon with newspaper and spray painted it yellow. I cut the cute bat shield out on the Cricut and taped some curling ribbon to the back, then hot glued the shield to the balloon.
For the activities, we had the kids decorate their own masks with glitter glue and jewels.
I was quite surprised that even the boys really got into it.
We did face painting (not really a batman thing, but my kids just love face painting).
Luckily, my party store did have a few batman games on clearance. We bought a pin the bat symbol on batman and a joker target shooting game. (I forgot to take pics). We also made cotton candy... totally unbatman, but kids love that too.

And I couldn't have a batman party without Batman capes. Luckily, my mom has an awesome fabric stash, so it was free to make these. I kind of used this tutorial from Puking Pastilles. She has a pattern for sale as well. I just used the idea and made my own pattern out of newspaper. I cut the bottom out like a bat shape. Then I just serged the edges of the capes. I sewed velcro on the tabs to close them in the front. I downloaded a free Batman font off the internet and printed out the monograms. Then I appliquéd them onto the capes. My "T" already had a Batman cape, of course, so I made him a Robin cape.
And last, but not least, after the party was all over, I stayed up late to make my fondant covered birthday cake... for his Sunday family party. It looks so simple, but really was a bit of a pain.
Happy Birthday Big T!!!

Okay, what's my next project... bring it on:)

Sunday, August 14, 2011

A few sewing projects for my Boys

I just thought I'd share a few sewing projects I did this summer for my boys.
I thought it would be a good idea to make a Car Organizer. We travel a lot and I thought it would be a great idea to have a place for my boys to keep things to keep them busy. The two older boys loved them. They could put their DS's in there, colored pencils, coloring books, toys and even their trash. My two year old just took everything out of his and threw it on the floor.
My boys love going to the library and we go once a week. I got tired of holding all of their books, so I took them fabric shopping and let them pick out their own fabric. My 7 year old picked the flames. My 5 year old picked Green Lantern. And my 3 year old is obsessed with Batman right now. I didn't follow a tutorial, but I just made a simple lined bag with handles. I punched a hole in their library card and clipped it to a handle with a carabiner. They love their bags and it makes it so we can keep their library books all in once place.

Happy Sewing!

Anisa

Thursday, August 11, 2011

Re-do on a Dime Presentation

This past week, my ward asked me if I would do a little presentation on "Re-do on a Dime." It was fun to do the class and it made me get caught up on a few projects that I needed to finish.

This is the display table that I set up. I then went though each item and talked about the technique used to create the item.

One of the big thing that I suggested was decorating the big, expensive things in neutral tones... like your couch, carpet, etc. Then, add the color with paint, accents, throw pillows, curtains, etc. Neutral toned furniture tends to not go out of style as fast. I learned that the hard way by purchasing a few plaid couches that were outdated in just a few years but in very good condition.

-Anisa

Tuesday, August 2, 2011

Tire Swing Tutorial

In my efforts to keep my kids out of the house... I decided to build a tire swing. My little boy's preschool teacher had one a few years ago and it seemed like a hit at his preschool. We saw a hard plastic one at Home Depot a few weeks ago, but they wanted $65 for it! We decided that we could build one ourselves.
The first thing I did was head to my nearest tire store. I asked them if they had any old tires that I could have (for free). They took me out back and I picked a fairly large one. The 2nd step was to paint it. The nice lady at Home Depot seemed to think that any type of paint would work on rubber. I like the Behr paint that has primer. I wanted something bright. A quart would be plenty for sure. I had a couple of reasons why I wanted to paint it... first, I didn't want the kids turning black from the dirty tire and 2nd I was hoping it would keep it a little bit cooler. (Now, I don't know if the paint will last forever, but that's okay)
The next thing we did was measured the tire's circumference and divide by three. That way we knew where to play our three chains.
We bought 3 U bolts. We drilled holes in the tire to put the bolts through. We cut our 3 chains about 5 feet long. (One thing that I have learned is that the nice employees at Home Depot will cut your chains to length for you). We put the chain through the bolt then secured it to the tire with the nuts on the inside. The bolt comes with a bracket on the back, but we added washers for more strength.

Now, you have a tire with 3 chains coming from it... the top is the tricky part. We wanted our tired to be able to swivel.. that way our kids can make themselves sick spinning in circles. The nice employee at Home Depot was no help. So, my crafty dad came to the rescue and welded me a swivel. Now, if you don't have a super crafty dad, you can visit this site to purchase a ball bearing swivel... or google it and find another site. Or maybe the employees at your Home Depot will be more helpful.


We hung our tire swing from our existing swing set. You could hang it from a large tree or be creative!!! All 3 boys fit on it perfectly and they have created several games that they can play on it. It's been a huge success.... but they still don't like playing on it in 103 degree weather.... please cool down:)

My only concern is that I may need to drill holes in the bottom of the tire for drainage... the sprinklers fill the tire up with water.

If you have any questions, feel free to leave a comment.

Anisa