Showing posts with label pillow. Show all posts

Saturday, March 23, 2013

Spring is in the Air

It has been so nice and warm down here in Sunny St. George (until today).  So, my real purpose in this blog post is to make my South Jordan friends jealous of our nice weather.  And to prove that I can actually finish a project.  I have been working on my front porch for awhile... and I finally got it done!

Here is my (Southwest, St. George style) house.  Not at all the style of house I would choose.  But, I love my neighborhood and the friends I have here, so I'll take it for now.  As you can see, there is a cave that goes back in to our front porch.  The left front of the house is a Casita (mother-in-law apartment) that is 90% my craft room and 10% my husband's office.  The right is the garage.  And behind all of that is our house... the part we live in.
As you head back into the cave, you can start to see our front porch.  
As you can see, there is space at the left for my bistro table.  And not a lot of space at the right.  It's not symmetrical... it would drive my mother crazy... and it drives me a little crazy too.  But, I've had the bistro table for probably over 10 years and I don't want to get rid of it.

Here's a close up of the bistro table.

 I picked up this green fabric at a yard sale and recovered some pillows.  I made the fabric flowers so that they safety pin on (I would like to change things up a bit for fall and winter).
 I've had the garden box forever... I'm thinking it may have been something I bought at Tai Pan.  Its filled with flowers, garden tools, gloves and some styrofoam covered fabric balls.
 I picked up this metal stand a few weeks ago at a yard sale for $10.  I was so excited about it!  It matches my bistro table perfectly.  The plant pot was also something I picked up at a yard sale.  My favorite igloo cooler was a vintage find from a yard sale as well.  It's metal and I was so tortured as to weather I should paint it or not.  But after talking to the paint department at Lowes, they told me that I would be able to remove the paint, so I went for it.  And the rain boots were something my husband picked up for me at a rental house... and I spray painted them pink!
 I've been loving all of the yard wrapped stuff on Pinterest, so I went ahead and make a wreath.  It was a pain in the butt, but I love it!!!  I added some flowers with pins in the middle so that I can take them off later.  And I have some fabric letters clipped on with mini clothes pins so I can remove them too.
 And even though today was one of the coldest days in awhile, I finally got all of my pots planted.  I've had these pots for a few years, but they needed an update... turns out turquoise spray paint was perfect!
My goal is to finish some projects... most of my rooms are 90% done, but they need some finishing touches!

Sunday, June 3, 2012

Granny's Cottage

I've been super busy.... and I'm getting way behind on my scrapbooking:)  Seriously, I'm a year behind and it's killing me!  Here's a little snippet of one of my MAJOR projects.  
My cousin (Libby) and I have taken upon ourselves the project of our Grandma's house.... we call it Granny's Cottage.  We've had a death in our family that has made this house vacant.  We'd love to keep the house, but it's really a money pit.  Our grand plan it to make it a vacation rental.  We've been cleaning, painting and decorating.... it's been a major undertaking.  One of the biggest problems was that the house wasn't kept clean.  Another problem was that when our family painted the house, they were very "efficient" and painted everything one color.  This turquoise room was turquoise... the walls, ceilings, trim, doors, everything... even the hinges and door knobs because, heaven forbid anyone should tape anything (okay, I'm off my soap box).  This is the first bedroom that we feel like is finished.  We have been trying to be as cheap as possible.  So, we've tried to use fabric and things that we already had. 
The back throw pillow with the pompoms was made with fabric my mom had in her stash... I love it!  Libby made the cute orange one with fabric she had in her stash.   My idea for the front pillow was kind of a combination of this pillow and this shirt.  I had the brown fabric only scraps... so I wanted something that used little of that fabric.
What's a cute cheap decorating idea?.... a bunting!  I used my map scraps and my fabric scraps. I got the idea from Dottie Angel.... super cute vintage stuff.
I already had a lot of embroidery hoops on hand from my previous craft room.  They were just sitting in a box, so I pulled them out!  We added a few more so that we could have some of the fabrics we had used in the room.  Always a super cheap and easy way to decorate a room.
This dresser was an awesome vintage find that we already had in Granny's house!  I love it!  I love the worn vintage look and I love the orange handles.  Libby wants to paint it, but I won't let her:)  The top is really quite worn, so I made this cute table runner out of doilies... got the idea here.  I wish I would have taken a better picture of my doily table runner for you:)  Libby had the vintage art from her Grandma's house.  And Libby and I have been collecting the white milk glass from yard sales and DI.  I don't know if we are going to put anything in it or not... I guess I should at least get candles:)
Now, back to my original picture of the whole room.... Don't you love our vintage bed?  This was one of the treasures that was already in Granny's house:)  Libby had the awesome afghan from her grandma.  Libby got the night stand at DI and painted and glazed it.  I found the awesome vintage lamp at a yard sale, of course!  And no night stand for a vintage room is complete without a doily:)  I made the curtain out of an old sheet and a few fabric scraps we had left.  

This has been a rather fun project for us, but very time consuming!  I'll keep posting as we get more rooms finished:)

Friday, October 21, 2011

The Science Bed

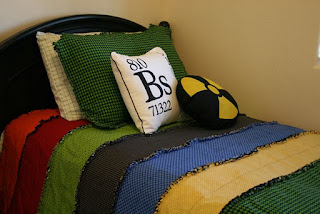
My little scientist thought it would be fun to have a Science Room. I thought it would be fun to make it super colorful!

I started with my favorite craft... framed silhouette art. I still love this super easy and inexpensive way of decorating.
I had a lot of fun with the throw pillows. For the square pillow I took the idea of an element from the periodic table. But instead of using the letters and numbers of a real element, I used letters and numbers associated with my son and his birth. For the circle pillow, I appliqued a nuclear symbol.
I made the bedspread. My original plan was to make a flannel rag quilt. I went searching for flannel, but I didn't really like anything that I was finding. So I decided to make a rag quilt out of cotton. I used black for the backing so that all of the cut edges have black in them. I love the way that it turned out.
I love the black with all of the colors. I am having so much fun with the science room. I am almost done with the whole thing and will post pics of the whole room when I get it finished!
Anisa

Sunday, October 16, 2011

No Sew Fleece Pillow Tutorial

I've been busy redecorating my boys' rooms... in and amongst all of my other craft projects. I'm getting close to being done so that I can post the final pics, but I thought I'd throw in a quick tutorial.

We've all seen the no sew fleece blankets. They've been around for a few years. (My oldest had a few as a baby, but he chewed on the tassels like a little dog... gross...so I had to take them away from him.) Anyway, my mother in law made my boys no sew fleece pillows a few years ago. The boys have loved them, but they no longer match their room. So, I decided to make them new ones. I took them to the fabric store and let them pic out their fabric.
The first thing you do is to cut your two pieces of fabric 8 inches larger than your pillow form. I had a 16" pillow form, so I cut my fabric squares 24"x24".

Because I like to do things as quick as possible, I kept the two pieces of fabric layered on top of each other so that I could cut both pieces at the same time.
You need to cut a 4" square out of each corner.
Then, go around the edges and cut strips about 1" wide by 4" long. I used my rotary cutter and it went super quick!
Last, put the pillow in between the layers of fabric and tie the tassels together.
That's it!!! These were so fast. I think I made both of them in about 30 minutes... but I may be exaggerating a tiny bit.
They look great on their bed with the fun pillow shams that I appliqued. When I get the room completely finished, I'll take some pics of the pillow shams up close.

Wednesday, May 19, 2010

Front Porch Pillows


I live in Daybreak. It's a planned community with the idea of older style homes and front porches. We have a lot of fun colorful houses in our neighborhood. I have mixed feelings about my front porch. I would prefer to have it open so that I can sit out on my bench and watch my kids play in the street. However, I do love that it hides the scooters that are always parked on the front porch. Anyway, I put my cute yellow bench out on the front porch and I wanted to decorate it with some pillows. I have been wanting to make something with burlap... since it's so trendy right now. So, I thought I'd do something with pillows!

I started with this pillow. I bought outdoor fabric at Joann. I followed my own tutorial to make it a slip covered pillow. Then I just cut a strip of burlap and sewed a reinforced stitch around the edge so it wouldn't fray. I sewed it into a band and made another smaller band to cinch it up in the front. Then I attached a fabric (burlap) flower that I made using my tutorial here.


Then came the fun part. I really liked the pattern in the fabric. And I wanted to make a smaller coordinating pillow out of burlap. So, here is what I did.


  • I enlarged the pattern on my copy machine. I think it was about 8x8.

  • I traced the pattern onto freezer paper.

  • I used an exacto knife and small scissors to cut out the pattern. ( I got lazy and just cut out the part that repeated.
If you would like a more detailed tutorial on freezer paper stencils, you can find one here.

  • I ironed the freezer paper stencil onto the burlap and used a sponge brush to dab acrylic paint onto the burlap. (this is where the lazy part came in. I had to take the freezer paper off and turn it 4 times to get the repeating pattern. That seemed easier than cutting it out.)

  • I heat set the paint on with the iron.

  • I sewed the pillow using the same slip covered pillow tutorial.

Here's the funny part... I was worried about a pillow form getting wet on the porch and getting moldy, so I made my pillow form by stuffing a ziploc bag with polyfil!!!


It turned out totally cute!!!

Now my front porch has a cute set of matching pillows.

And I love the way they look on my yellow bench (scooters have been removed for the photo)
Maybe I don't hate sewing so much after all... I just hate sewing clothes!!!


-Anisa


Tuesday, November 3, 2009

Countdown to Crafts- Easy Throw Pillow

We have started something new and fun!!! We are doing a Countdown with Crafts to help you get ready for the Holidays. For my first project, I bring to you and fun and easy throw pillow. If you go to Joann Fabric and Craft Stores this week, they have their Soft n' Crafty pillow forms on sale for 40% off. I made this pillow by taking basic white fabric. I pinned the ribbon on to the fabric, then sewed it on.... make sure you sew down both sides of the ribbon. I used ribbon from my stash, but scrapbook ribbon is also on sale at Hobby Lobby this week. After I made this pillow, I saw this post on Ucreate from the guest blogger Polka Dot Chair for a skirt just like my pillow!!! Weird Deja Vu. Check out her tutorial, she does it a little differently.


This pillow is also for sale at my SEEDLINGS boutique this FRIDAY at my home. Check out the blog for details!!!

Tuesday, February 24, 2009

One Craft 3 Ways.... Applique

One of the great things about starting this craft blog is that we have deadlines. I have been wanting to make this applique pillow for almost a year to match my guest bedroom. But it just kept getting put on the back burner. Then when we decided to do applique for our "One Craft 3 Ways" I was excited that I would now have a deadline to get it done.

What I did.... First, I went fabric shopping (my favorite part). Then I cut out the fabric for my throw pillow. If you would like to see a tutorial on how to make a throw pillow similar to this one, go here. Then I traced my designs on paper. Next, I cut out my fabric about the same size that I needed for my shapes, but I did not cut out the shapes. Then, I ironed on the heatNbond to the wrong side of my fabric. Then I cut out the shapes (you see, this way I don't have to cut out the shapes twice.) Then I ironed the shapes onto my white pillow fabric. Then comes the hard part. I set my machine to a tight zigzag. Then I zigzagged around the outside of the shapes. It was somewhat difficult to make good corners and such. If I were to do this again, I would use a different type of stitch. Then I finished up my pillow. During the process, I would probably have said I would never do it again. But it is so cute finished, that I think I will. I will just learn how to do it better!!! -Anisa

Deadlines...yeah, this is our third and final deadline for this post. :) It is nice to get something like this done.This applique wall hanging measures 11" x 13". I'm framing it and hanging it in my little girl's room. It was a lot of fun doing the embroidery by hand and using several different stitches and styles to complete it all. --Cami

I have been wanting to do some applique on T-shirts for my kiddos for sometime now. I found an uber-cute skirt at The Children's Place and decided I could make a cutie-pie shirt to go with it for my littlest princess. Would I do it again? Maybe. I thought the knit fabric of the tee was hard to work with. I'd definitely be willing to try it on something not quite so stretchy, though. I do love the overall look and am contemplating what else I might like to do for some added embellishment. Happy crafting!


-Ang


Tuesday, November 11, 2008

Throw Pillow Slip Covers

I never buy throw pillows (okay, hardly ever). I feel like I can make them quickly and inexpensively. I'm not a major sewer, but if you can sew straight lines, you can sew this!
The first thing that you want to do is measure your pillow.

My pillow was 19" square. Then, I cut the fabric for the front of my pillow. You will want to cut your fabric 1" bigger to allow for 1/2" seam allowances.

The back of your pillow is going to have 2 pieces of fabric that overlap. This way, you can take the fabric off and wash it easily. To cut the back pieces, you will want them to be half the size of the pillow plus 2-3". So, I cut my pieces 13". Then, you will need to turn over one edge of each of the pieces. These are the edges that are going to show when you have your finished pillow.

The next step is to pin your pieces of your pillow together. You will want to lay the front of the pillow on a table, front side up. Then you will want to lay your two back pieces on top of that front sides down. You will want to have your turned over edges on the inside of the pillow, overlapping.

Pin all around the outside, then take it to your sewing machine and sew all around the outside edge. Flip your pillow right side out and stuff your old pillow inside!!!

This project takes less than 1 hr. (it probably took me longer to post this on the blog.) It also is quite in expensive if you already have a pillow that you are just recovering. All it costs is the fabric. For this one, I used just a little over 1/2 a yard.

Good luck and email me if you have any questions.

-Anisa