Wednesday, October 26, 2011

Halloween Character Jars

I saw this cute idea in my most recent issue of Scrapbooks Etc. magazine. So I started saving my pickle jars, and any other kind of jar that I could find. I even asked friends to save a few jars for me.
Then I started spray painting lids all sorts of different colors. I made the characters that were in the magazine and I also came up with a few of my own. They turned out totally cute and I had tons of fun making them.
I think I'm going to use them as a centerpiece at my kids' halloween party. And I was thinking of giving them away as guesstimation jars.... whoever guesses closest to how many candies, wins the jar.

Tuesday, October 25, 2011

Bunting Valances

For the boy's bedrooms, I thought it would be fun to make a bunting in place of the window valance.

For the science room, I made the bunting out of fabric scraps left over from the quilt. I made squares that were elements on the periodic table. I printed them on iron-on fabric and ironed them on. Then I sewed around the edges. I sewed the squares onto some black binding that I had on hand. My little scientist loves it!!!
For the superhero room, I made a bunting out of several different superhero symbols. This bunting was made out of cardstock. I printed the symbols and traced them onto the cardstock. I then laminated it. I punched holes in the corners and threaded ribbon through it. My boys love it and it was a great way to incorporate many superheros.

To attach them to the wall, I simply used a thumb tack... nothing fancy.

Stay tuned for more bedroom re-do projects:)

-Anisa

Friday, October 21, 2011

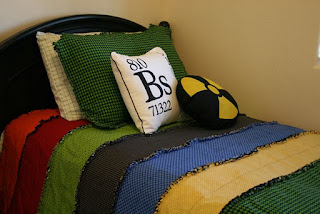
The Science Bed

My little scientist thought it would be fun to have a Science Room. I thought it would be fun to make it super colorful!

I started with my favorite craft... framed silhouette art. I still love this super easy and inexpensive way of decorating.
I had a lot of fun with the throw pillows. For the square pillow I took the idea of an element from the periodic table. But instead of using the letters and numbers of a real element, I used letters and numbers associated with my son and his birth. For the circle pillow, I appliqued a nuclear symbol.
I made the bedspread. My original plan was to make a flannel rag quilt. I went searching for flannel, but I didn't really like anything that I was finding. So I decided to make a rag quilt out of cotton. I used black for the backing so that all of the cut edges have black in them. I love the way that it turned out.
I love the black with all of the colors. I am having so much fun with the science room. I am almost done with the whole thing and will post pics of the whole room when I get it finished!
Anisa

Tuesday, October 18, 2011

A few Scrapbook pages

I just thought I'd post a few scrapbook pages that I made a few months back... before I started on a million other projects and haven't had time to scrapbook. I'm trying to get them all finished so that I can get back to scrapbooking again.
I love the crossword puzzle paper... and I love circles:)

I love it when I get the chance to do anything girly... and with those shorts.... I had a great color palate!!!

Sunday, October 16, 2011

No Sew Fleece Pillow Tutorial

I've been busy redecorating my boys' rooms... in and amongst all of my other craft projects. I'm getting close to being done so that I can post the final pics, but I thought I'd throw in a quick tutorial.

We've all seen the no sew fleece blankets. They've been around for a few years. (My oldest had a few as a baby, but he chewed on the tassels like a little dog... gross...so I had to take them away from him.) Anyway, my mother in law made my boys no sew fleece pillows a few years ago. The boys have loved them, but they no longer match their room. So, I decided to make them new ones. I took them to the fabric store and let them pic out their fabric.
The first thing you do is to cut your two pieces of fabric 8 inches larger than your pillow form. I had a 16" pillow form, so I cut my fabric squares 24"x24".

Because I like to do things as quick as possible, I kept the two pieces of fabric layered on top of each other so that I could cut both pieces at the same time.
You need to cut a 4" square out of each corner.
Then, go around the edges and cut strips about 1" wide by 4" long. I used my rotary cutter and it went super quick!
Last, put the pillow in between the layers of fabric and tie the tassels together.
That's it!!! These were so fast. I think I made both of them in about 30 minutes... but I may be exaggerating a tiny bit.
They look great on their bed with the fun pillow shams that I appliqued. When I get the room completely finished, I'll take some pics of the pillow shams up close.

Tuesday, October 11, 2011

My new feet!

I'm giddy about my new feet.... I guess I am just naive when it comes to the world of sewing. I sew straight stitches and that's about it. I barely know that there's a zipper foot (I've never sewn a zipper on anything) let alone other cool feet!

Okay, so I would first like to introduce you to the wide gathering foot. This thing is amazing. It gathers for you! You put the foot on, put your fabric in and start sewing. Soon I will show you the awesome scarves that I'm making with this foot.
Second I would like to introduce you to the ruffling foot. Quite complicated looking and really quite even more amazing. This little foot will gather and pleat for you and sew it to the bottom fabric all in one fail swoop. It is perfect for making aprons and dresses and the like. When I get done making scarves, I'll show you what it does for an apron. I am in love!!!


So, the truth be told, I've been working on projects like crazy... but Pinterest has sucked away all of my time on the computer and I have not been blogging much. I have a lot of projects that are almost finished and I'll get pictures of them up very soon:)