Thursday, June 13, 2013

Minecraft {Birthday Party}

Let me just say that I don't get the Minecraft game... but nevertheless, I got to plan a minecraft party.
For the invitations, I found this minecraft box printable.  I opened it in Photoshop and added text for the party.  We filled the boxes with rock candy.

My son mostly just wanted to get his closest friends together for a "late night" to play minecraft on the ipads.  However, I had to have somewhat of a party, so I decided to have a BBQ to feed the kids.

We set up our table in the back yard with some of the foods that you can eat in Minecraft.  We had pork, bread, melon, baked potatoes, carrots, red apples and golden apples and chocolate chip cookies and cake for dessert.  For decor, I printed this banner from the Party Animal and hung the "ghast" piñata my hubby and I made above the table.
I set the table with simple black square plates and napkins... a print out of the Menu and the silverware was in a gray striped paper bag from Pick Your Plum with a strip of green washi tape from Downtown Tape.
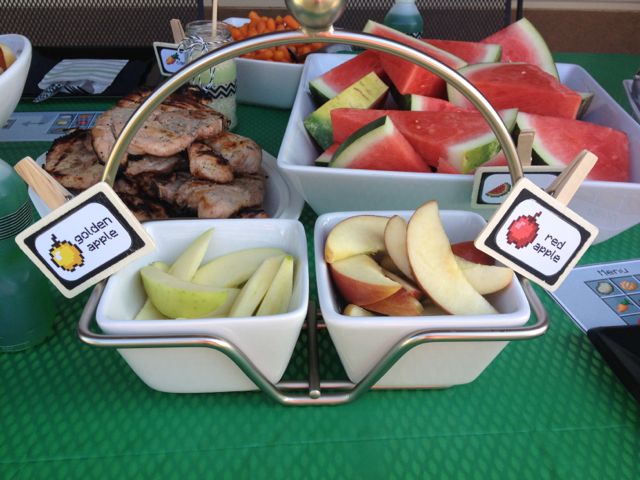
I used my cute little chalk board labels that I got from Pick Your Plum to label all of the foods.  I didn't just want to write on them in the chalk because I wanted the cute pixelated pictures on them.  So, I just printed those out doing a google search for the pictures.
I made my minecraft cake very simple.   Just a square cake covered with white fondant... and red squares out of fondant.
For the treat bags, I printed a Steve head on a brown paper bag.  Then, the kids had to go on into the back yard and find little square papers that were different textures from minecraft.  They had to bring those back to the crafting table and could get different prizes to fill their treat bag.  (I had printed the squares and crafting recipes from a blog, but my pin on Pinterest isn't taking me to the correct link for you to follow.)
Here is a picture of my youngest doing his crafting.  I covered a card board box with brown butcher paper and my hubby used black electrical tape to make the design on top.
My hubby and I made swords and pick axes from foam board and printouts he found online (he doesn't use pinterest, so I can't find where he got the printouts).  It was a pain in the rear... I wouldn't recommend it.... but that was mostly because I was having issues with my printer.... maybe you would have better luck).
I made the piñata is simply a cardboard box covered with white crepe paper.  Then we cut the face out of card stock.  Easy peasy.
We were able to use this print out to make our Steve head.  After the swords, there was NO way I was making a head for every boy, so we just made one to use instead of a mask for the piñata.  It worked out great.  (and just FYI, the creeper shirt was just purchased at Kohl's).

After the Piñata we headed into the house and the boys gorged themselves on candy while they played Minecraft on the ipads for an hour:)

Tuesday, June 4, 2013

Gallery Wall

My living room doesn't have a lot of wall space.  There is a very large window on one wall and a very large entertainment center taking up the other wall.... and there are only two walls.  There is a very small wall next to the fire place where I put my half computer desk.  That was the only space I could use.

I had been really wanting to have a gallery wall somewhere in my house.  I'm kind of a hoarder when it comes to picture frames.  I buy them at yard sales just because I like them.  It was time to get them out of the closet and on the wall.  

I love the way it turned out!  It's a bit busy, but it works for me.  
 I took my inspiration from this post on Leanne Barlow Elle Aparel.  I loved the mix of vintage and new.  I loved adding the monogram.
When I got married, I loved cherry wood, so my wedding picture was framed with a beautiful cherry frame... it hasn't ever really matched my house well.  However, with the mixture of painted frames and vintage frames, the cherry fit in well.  I loved the silhouettes I had made for my house a few years ago.  And I just wanted to incorporate some family pics as well.    The monogram S is simply vinyl stuck on the wall in an empty frame.  I got the free "count your blessings" printable at Lil' Luna.  It's probably supposed to be for Thanksgiving, but I consider my family my blessings, so I want it up year round.

I love the way it turned out and I'm glad I finally got some of my frames up on the wall... now if I could just let myself stop buying frames:)

Thursday, May 23, 2013

Western Blue & Gold Cub Scout Banquet

Howdy partner!  I just wanted to take a few minutes to share with your our blue and gold banquet this year!  I don't know if I've mentioned this before, but I'm not creative!  I'm great at stealing other people's ideas and making them fabulous.  A friend of mine did a western theme in her ward, so I stole her idea.
Let's start with the invitations...
I wanted them to look like a "wanted" poster.  I looked at several ideas online and combined them to make it work for me.  I have photoshop elements and I love it... it's easy to use and inexpensive.  I tore the edges and inked them to make them look old and dirty.
 My favorite part of the whole thing was my centerpieces.  I borrowed and bought a few bandanas... I wanted them to be blue or gold.  Then, I went to my dad's farm and cut some old barb wire off a broken fence.  I just wrapped it in a circle twice and wired it together.  The pinwheels in the mason jars were made for the blue and gold banquet last year.  I simply added a cowboy silhouette cut from my "A Child's year" cricut cartridge.  And I found some bandana print ribbon at Michael's to put on the mason jar.  Then, I tossed a horse shoe on the table with it!  I only drew blood a few times, but totally worth it!
 Here's a picture of the whole table.  I wish I would have gotten one with the food on it!  We went to Village Inn and they donated old pie tins to us to use for our dishes...
 In the back of the gym, I hung a line with "Wanted" posters of each boy.  I went around to their den meetings the week before took their pix.

Here's a close up... it has the scout oath at the bottom.  Thanks for the idea Brandy!
So, here is a picture of the whole back side of the gym.  (P.S.  I hate the colors of our church)

 On the other side of the gym, I set up the "chuck wagon."  I cut a few bandanas up into a banner and cut letters out of black felt to attach to them.  We served sloppy joes... and sarsaparilla (homemade rootbeer) and had everyone else bring salads, baked beans or dessert.

 My son was assigned to bring dessert, so I made a cactus cake... it was super easy.  I just baked it in a glass pyrex bowl.  Then I frosted it with green frosting... kind of a spiky tip... I can't remember the tip names.  Then I stuck spaghetti in it!  The "dirt" was crushed cookies.
Our church does not have a stage...weird huh?  So, I set up my own stage.  My brother just so happened to have a wooden cow (but that's whole long story).  I borrowed the cute milk jugs from my friend Brandy.  And I just made a stage by hanging bandanas over some twine.  For the entertainment, we went through the scout books to find something that was a requirement (or elective) for the boys.  The wolves did a skit, the bears made their own instruments and had a band and the webelos did the scout promise in sign language.

 Finally, here is a picture of the other side of the gym!  It seriously turned out soooo cute!!!

Wednesday, April 3, 2013

Gift Card Bouquet

My brother-in-law got remarried over this past weekend.  What do you give to someone on their 2nd wedding???  The best I could come up with was a gift card.  I didn't want to just give them a gift card..... I wanted to make it cute.  I talked with most of the rest of the family and I got them on board too.  

I used my Cricut Designer's Calendar cartridge and cut out tulips that were 4".  I cut out two for each flower.  I glued them just on the sides and bottom with a wooden skewer inside.  That left the top open for the gift card to slip inside.  I then just stuck them in a vase with some twine tied to the vase and a tag.  It turned out really cute and was a fun gift idea.


Saturday, March 23, 2013

Spring is in the Air

It has been so nice and warm down here in Sunny St. George (until today).  So, my real purpose in this blog post is to make my South Jordan friends jealous of our nice weather.  And to prove that I can actually finish a project.  I have been working on my front porch for awhile... and I finally got it done!

Here is my (Southwest, St. George style) house.  Not at all the style of house I would choose.  But, I love my neighborhood and the friends I have here, so I'll take it for now.  As you can see, there is a cave that goes back in to our front porch.  The left front of the house is a Casita (mother-in-law apartment) that is 90% my craft room and 10% my husband's office.  The right is the garage.  And behind all of that is our house... the part we live in.
As you head back into the cave, you can start to see our front porch.  
As you can see, there is space at the left for my bistro table.  And not a lot of space at the right.  It's not symmetrical... it would drive my mother crazy... and it drives me a little crazy too.  But, I've had the bistro table for probably over 10 years and I don't want to get rid of it.

Here's a close up of the bistro table.

 I picked up this green fabric at a yard sale and recovered some pillows.  I made the fabric flowers so that they safety pin on (I would like to change things up a bit for fall and winter).
 I've had the garden box forever... I'm thinking it may have been something I bought at Tai Pan.  Its filled with flowers, garden tools, gloves and some styrofoam covered fabric balls.
 I picked up this metal stand a few weeks ago at a yard sale for $10.  I was so excited about it!  It matches my bistro table perfectly.  The plant pot was also something I picked up at a yard sale.  My favorite igloo cooler was a vintage find from a yard sale as well.  It's metal and I was so tortured as to weather I should paint it or not.  But after talking to the paint department at Lowes, they told me that I would be able to remove the paint, so I went for it.  And the rain boots were something my husband picked up for me at a rental house... and I spray painted them pink!
 I've been loving all of the yard wrapped stuff on Pinterest, so I went ahead and make a wreath.  It was a pain in the butt, but I love it!!!  I added some flowers with pins in the middle so that I can take them off later.  And I have some fabric letters clipped on with mini clothes pins so I can remove them too.
 And even though today was one of the coldest days in awhile, I finally got all of my pots planted.  I've had these pots for a few years, but they needed an update... turns out turquoise spray paint was perfect!
My goal is to finish some projects... most of my rooms are 90% done, but they need some finishing touches!

Friday, February 1, 2013

Angry Birds Birthday Party

My Joren decided a long time ago that he wanted an Angry Birds birthday party.  His birthday is so hard for me because it's right after Christmas (Jan. 3rd) and I always feel like I have so much other stuff going on... but, I want to make it just as important as all of my other kids' birthdays.

When we moved into our house, I was excited to be able to use my cute dresser in my kitchen.  Even though it had to be in front of a window, I wanted to have it for decor, storage and for the dessert table for parties.
It turned out really cute.  I found this free angry birds printable party pack at Shery K Designs... it was so nice to have!   It made things much easier for me.  I printed out the banner and of course, laminated it.  I had the pinwheels from my float on the 4th of July.  I made another black one and added the angry bird faces in the middle.  I put a stuffed angry bird in a sling shot.  And I wanted a dish of candy... I opted for gumballs.
Here's a close-up of the pinwheels.  
 I was able to squeeze our kitchen table and a folding table in our dining area.  I added a few balloons to the table.
 My table setting was very simple because I'm way too cheap to pay for angry birds cups, napkins and plates.  I splurged and bought one package of napkins... just black plates and red plasticware from the dollar store.  And I made a label for the drink containers with a little baker's twine tied around it.
 I had made these fun wood balloons when I used to teach wood craft classes.  I printed an angry birds face to tape to the front for another centerpiece.
 We had the party around lunch time and served the boys Angry Birds pizza.
For Joren's school class, I made each kid an Angry Birds Pig cake pop.    I didn't want to make a bunch of fondant to decorate then with.   I put a normal size m&m on the cake pop for the nose and mini m&ms for the ears.  Then I dipped it in green candy melts.  Before it cooled, I put the candy eyes on and brown sprinkles for the eyebrows and nostrils.  It worked out pretty well... some were way better than others.
I made Joren's cake.  It was just a simple 9x13 cake.  I frosted it green and made a little grass.  I stacked candy bars and put a few of the pig cake pops on the cake.  The sling shot was tootsie rolls and licorice (the tootsie roll melted when it got too warm).
 The majority of my activity for the party was our life size angry birds game.  I just made a face out of felt and glued it to the ball.  Our sling shot was two fence posts and some surgical tubing.
I made the pigs with green paper, clip art and #10 cans.  I spray painted some of the boxes until I found wood grain contact paper at the dollar store.

Our pinata was kind of sad... but who cares, when it's going to get demolished any way.  We made it with a balloon and just wrapped green crepe paper around it.  I printed the face off my computer and glued it on.  And I made a crown and ears out of card stock.  I don't know if it even had time to completely dry, but it lasted through all of the kids!


On their way out the door, the kids got a treat bag with an angry birds 3D puzzle and an angry birds fruit snacks package.  I love my cute striped bags from Pick Your Plum and the washi tape and stickers.